, for the remainder of the Italian Campaign. The division operated as a strongly reinforced division and was frequently used to spearhead the advance of the Corps and Army to which it was attached. They returned home after the end of the war in Italy and were disbanded in 1946. The division was also briefly active after the war from 1 July 1948 to 1 November 1949.
Founding
The possibility of forming a South African armoured division was discussed as early as April 1941 between Major-General
1st South African Infantry Division and Prime Minister (Field Marshal) Smuts. At this time, South Africa was struggling to maintain the manpower levels needed to sustain two infantry divisions in the field.[b] The 3rd Division was based in South Africa and was to provide the pool from which reinforcements were drawn to supplement the 1st and 2nd Divisions. All South Africans serving outside of South Africa were volunteers and far fewer men than expected volunteered their services and the view was held that if this trend continued, it would be necessary to convert one infantry division to an armoured division, as an armoured division would require fewer men.[c] Later, the vision was to establish two armoured divisions, as lower manpower levels became more pronounced.[1]
After the Second Battle of El Alamein, the 1st Infantry Division was withdrawn to Quassasin with the understanding that its 1st Brigade would return to South Africa to regroup with the 7th Infantry Brigade (at this time the 7th Infantry Brigade was in Madagascar) to form the 1st South African Armoured Division. 1st Infantry Division's 2nd and 3rd Brigades would remain in Egypt to form the 6th South African Armoured Division which would replace the 2nd Infantry Division which had been captured at Tobruk in June 1942.[1]
By January 1943, the Allied leaders had decided at the Casablanca Conference to pursue the war by invading Sicily, reducing the need for the number of armoured divisions as compared to those needed in the Western Desert.[2] This, together with further manpower shortages led to the plans for a 1st South African Armoured Division being abandoned, with only the 6th Division being considered viable. All of the 1st South African Infantry Division brigades were returned to South Africa for re-training and amalgamation with other units to form the nucleus of the armoured division. The division was officially formed in South Africa on 1 February 1943 with Major-General W.H.E. Poole as commander and sailed for Port Tewfik in Suez on 30 April 1943 as a two brigade division, comprising 11th Armoured Brigade and 12th Motorised Brigade.[3]
Egypt
Training began in the desert at Khataba, north west of Cairo[4] and was focused on tank operations and integrating the Rhodesian elements into the division.[d] In addition, the lack of manpower had forced the merging of numerous units and much of the training time was spent on marrying up drills between the new composite units.[4] The period of training was finally concluded by a series of training exercises, Exercise Cape Town being the first from 1 to 3 December for the 11th Armoured Brigade (11th Armd Bde) and Exercise Durban from 5 to 7 December for the 12th Motorised Brigade (12th Mot Bde). Training was concluded with Exercise Tussle[e] as a British III Corps operation finishing on 21 January 1944[7] and on 23 January the division moved to Helwan.[4] By now, the division had been in Egypt for months due to indecision related to its role.[f]
On 3 March 1944, the division was instructed to move to Palestine and the advance parties left on 7 March. On 12 March however, this movement order was countermanded and the division was instructed to move to Italy. One year after arriving in the Middle East, the division embarked from Alexandria between 14 and 16 April to arrive in Taranto, Italy on 20 and 21 April 1944.[9]
Italy: Eighth Army
Detachment of 12th Motorised Brigade
Troops of the 6th South African Armoured Division arriving in Taranto, Italy. April 1944
Regrouping was still in progress after arrival in Italy, when the 12th Motorised Brigade with artillery and support elements was ordered to move to the area of Isernia to prepare to relieve the 11th Canadian Infantry Brigade in the Cassino area and to come under command of the 2nd New Zealand Division in the British X Corps.[6] These were the first division troops to enter combat in Italy.[9] The South African Brigade held these positions until after the fall of Monte Cassino and the breakout from the Anzio beachhead, when they were withdrawn and reunited with the division.[10]
Initial advance after the fall of Rome
Having formed part of
Tiber River to the east and Lake Bolsena to the west at a rate of 10 miles (16 km) per day, outstripping their flanking units.[13] On 10 June the Armoured Brigade which was leading the advance, came up against the anti-tank screen of the newly arrived German 365th Infantry Division south of Celleno. For the first (and only) time Brigadier Furstenburg was able to deploy all three of his armoured regiments and his motorised infantry battalion in battle to gain an important victory. Lieutenant-Colonel Papa Brits (Special Service Battalion [SSB]) and Lieutenant-Colonel Bob Reeves-Moore (Imperial Light Horse / Kimberley Regiment [ILH/KR]) received DSOs for their leadership in the defeat of elements of the 365th Division.[6] 11th Armd Bde's success permeated the whole division and on 12 June the division took Orvieto, having advanced 75 miles (121 km) in ten days. However, their daily rate of advance had been slowed considerably by consistently being in contact with the enemy.[14]
Cape Town Highlanders.
By 17 June, the
2nd Infantry Division at Tobruk two years previously, the surrender of South African troops in the field had become a sensitive matter. This prompted Prime Minister Smuts, who had been meeting the British Chiefs of Staff on 21 June, to divert his aircraft to Orvieto airfield on his way back to South Africa to discuss the political and military consequences of this event with the division command.[6]
LXXVI Panzer Corps on the Georg Line, a delaying position on the north side of Route 73.[17]
The strength of the Panzer Corps was not known initially and the leading elements of XIII Corps continued to probe forward expecting the German line to crumble under pressure without the need to launch a full-scale attack.
River Arno on 15 July. The South African Division could then continue their advance, directed on an axis towards Radda-Greve on the western side of the Chianti Mountains.[19]
The division made good progress, advancing with two brigades leading the advance: the 12th Mot Bde astride the road defining the division's axis of advance and the Guards Bde on the right flank, on the slopes of the Chianti highlands. Radda was secured on the night of 17 July and orders were then received for the division to secure the heights of the Chianti Highlands. The Guards Bde took Mt. Maione by a night attack on the night of 18/19 July supported by the tanks of the
Pretoria Regiment[20] while 12th Mot Bde attacked to take Mt. St. Michele (Pt 892) on 20 July. The division now held the heights of the Chianti range, dominating the Arno Valley and the advances to Florence.[20]
South African Sherman tanks disabled in the fight to take the Perugia Highlands. 1944
Florence
On 20 July General Kirkman, XIII Corps commander, issued orders for a "...powerful thrust to seize all crossings across the River Arno to the west of Florence."[20] This effort was to be concentrated on the 6th South African Armoured Division front. The advance was to be led by the South African Division with the 4th Infantry Division to its right, supported on the flanks by the 6th British Armoured Division and the 8th Indian Infantry Division.[20] The division's advance was slowed at the approaches to Greve due to heavy mining, where a number of tanks were lost but eventually the 11th Armd Bde succeeded in capturing Mercatale, which was defended by the German 356th Infantry Division supported by Tiger tanks. The division advanced through Greve and were again stopped by the German 4th Parachute Division on the River Greve[21] on 24 July.[22] The division had, however, outflanked the German Parachute Division, who then withdrew during the night of 24/25 July, allowing the South African, New Zealand and Indian Divisions to advance to the Paula Line which was reached on 28 July.[23]
Kirkman again placed the South African and New Zealand Divisions as the spearhead of his Corps advance, this time to break the Paula Line and to take Florence. The New Zealand Division would carry out the main assault and the South African Division would neutralise the enemy on the high ground west of
Imperial Light Horse / Kimberley Regiment patrol however found the smaller Ponte Vecchio bridge intact and crossed it under heavy shelling, entering into the centre of the city at 4 am, to be the first allied troops to enter Florence.[27][g][h]
After reaching Florence, General Pool recorded in a Special Order of the Day, that the division had "... covered 601 miles (967 km) since leaving its concentration area at Taranto, its artillery had fired 201,500 rounds, the Divisional Engineers had built sixty five bridges (one a day!) and had made 196 major deviations necessitated by 'blows' and demolitions. The signallers had laid 3,752 miles (6,038 km) of telephone cable."[30] The division was then withdrawn into Eighth Army reserve for rest and maintenance in the Siena / Castelnuovo area[31] until 17 August, when orders were issued for the division to be transferred from British XIII Corps to U.S. IV Corps to partially replace divisions withdrawn to the U.S. Seventh Army for the assault of southern France.[31][i] The 6th South African Armoured Division was assigned to their new Corps in the U.S. Fifth Army as from 22 August 1944 and was replaced in XIII Corps by the British 6th Armoured Division.[33]
Italy: Fifth Army
Crossing the Arno River
Pretoria Regiment Sherman on the summit of Monte Albano north west of Florence after crossing the Arno River
To continue the main Allied thrust north from Florence, the Arno River first had to be crossed. Reconnaissance patrols from the First City/Cape Town Highlanders [FC/CTH] found suitable crossing points close to Le Piagge allowing the 12th Mot Bde to cross during the night of 28/29 August under light enemy artillery fire.[34] Reports from prisoners indicated that the German forces in front of the division were withdrawing, and this was confirmed by the sound of demolitions ahead of them.[34] The 12th Brigade, as well as the Guards Brigade were tasked to send fighting patrols forward to determine the extent of the withdrawal. Reports indicated that the Germans had withdrawn across a wide front to what was to later become known as the Gothic Line. The division crossed the river thanks to Bailey bridges erected between the damaged abutments by the South African Engineers.[35] Under sporadic shelling and some units encountering light resistance, the operation was completed by 3 September.[36] General Pool, observing the lack of resistance ahead of the division, encouraged a rapid advance, but this was countermanded in order not to compromise the surprise of the main 5th Army attack north of Florence.[37] The order to wait and hold the Albano Massif until further notice was deeply resented by the division command and was considered representative of the persistent inflexibility displayed by the Fifth Army leadership.[38]
Apennines
The Eighth Army offensive on the German held Gothic Line was assigned the codename Olive and had commenced on 25 August 1944.[39]Ultra intercepts had shown that the Allies had a significant numerical superiority in manpower, armour, air and artillery, although there were concerns regarding the relative inferiority of Allied tank armour and gun power as compared to German equipment.[40][41] The U.S. Fifth Army attack was launched on 10 September against the mountain bastions south of Bologna and was led by U.S. II Corps. As part of the plan, the 6th SA Armoured Division was ordered to advance along Route 64 leading to Vergato and Bologna and to capture the twin peaks of Monte Sole and Caprara di Marzabotto.[42] The division's 24th Guards Brigade were first to encounter the Gothic Line defences when the Brigade met strong resistance from two battalions of the Lehr Brigade as well as two battalions of the 362nd Infantry Division, fighting from strongly fortified positions which had been prepared throughout the previous winter.[42]
After being ordered to hold the Albano Massif, the 11th Armd Bde was forced due to the terrain to operate dismounted from their tanks in order to contain the German 362nd Infantry Division. By 22 September, demolitions were again heard and it became evident that the Germans had started withdrawing to Green Line II, the next layer of the Gothic Line defences.[43] Operation Olive officially ended on 21 September 1944.[43]
Rhodesian elements of 11th Armoured Brigade on Monte Vigese. September 1944
The South African advance re-commenced with the division heading north on Route 64 with US II Corps to their right and U.S. 34th Infantry Division on the left. Reports had been received that the 16th SS Panzer Grenadier Division had taken over from the German 362nd Infantry Division and that they were now defending the front ahead of the South African Division.[44] By 28 September, the division was advancing on three widely separated axis, retreating German forces were demolishing bridges, culverts and roads and this, with traffic congestion on limited roads made passage extremely slow.[45] It was then decided to hand over Route 66 to Task Force 92, as the South African Engineers were not able to maintain the three parallel routes simultaneously. This permitted the Guards Brigade to re-unite with the 11th Armd Bde in protecting the US II Corps western flank.[46] Monte Vigese dominated the division's main line of advance. Two days of extended fighting in drenching rain against elements of the 36th SS Panzer Grenadier Regiment brought no break through and Poole then decided to pause and prepare a divisional attack on the mountain, to be led by 12th Mot Bde with 11th Armd and Guards Brigades in support. After an extremely heavy artillery bombardment of more than 10,000 shells, the attack succeeded.[47]
After this battle, the division was withdrawn for rest and maintenance. It was reassigned from U.S. IV Corps to direct command by the U.S. Fifth Army to enable the Army commander, Lieutenant GeneralMark W. Clark, to coordinate the division's advance more closely with that of U.S. II Corps.[48] In addition, the division was heavily reinforced with artillery and taking Combat Command B, an armoured brigade from U.S. 1st Armored Division, under command.[j] The division's major task became that of thrusting north towards Bologna covering the flank of the U.S. 34th Division. Combat Command B was to advance on Route 64, the 24th Guards Brigade along the Setta Valley road, with 11th and 12th Bdes covering the high ground between the two. Opposing the advance was the 16th SS Panzer Grenadier Division.[49] By 25 October the division had waded the Setta Creek and taken Hill 501 below Mt. Sole, but the Guards Bde attack on Mt. Sole was halted by torrential rains.[50] The following day the continuing rains had turned to floods, isolating the division elements on Hill 501 and suspending all air support from U.S. XXII Tactical Air Command.[51][52] Mt. Sole was not attacked again and the division was returned to U.S. IV Corps command on 4 November.[53] As winter set in, the U.S. Fifth Army entered a period of static winter campaigning patrolling from fixed defensive positions until February 1945.[54]
On 18 February the 24th Guards Brigade was transferred from the division to the British 56th Infantry Division in the British Eighth Army.[55] This ended an enduring relationship, particularly between the armoured Pretoria Regiment and the three Guards battalions.[56] The division was relieved by the U.S. 1st Armored Division's Combat command 'A' (which took over from 12 Mot Bde) and U.S. Combat Command 'B' (relieving the 11th Armd Bde) and was withdrawn to Lucca.[57]
IV Corps movements into the Po River valley: April 1945
Operations related to Phase Line "Green" progressed largely to plan and Phase "Brown" was initiated on 15 April. That night the South African Division was the first of the U.S. II Corps divisions to secure their objectives, taking Mount Sole in a series of well coordinated night attacks,[62] assisted by the heaviest tactical bombing support they had received to date in the campaign.[59] This was also the first combat experienced by the new 13th South African Motorised Brigade (13th Mot Bde) which had been sent from South Africa to replace the 24th Guards Brigade.[6] The battle had been fierce for all the division's troops involved and in the succeeding successful exploitation of Monte Caprara heavy losses were incurred. On 21 April, 11th Armd Brigade, who were supporting the U.S. 349th Engineering Regiment, converged on the centre of the town of San Matteo della Decima. Soon furious house-to-house fighting erupted which continued until nightfall and resulted in several tanks being destroyed by fire from German Panzerfaust rockets. Poole committed all available South African troops to flush out German snipers and anti-tank positions and by 22 April all resistance had ceased.[63]
These victories had created the opportunity for the armour to break through to Bologna as part of Phase "Black" and the South Africans linked up with the British 6th Armoured Division on 23 April[64] and in the process cut the lines of retreat of the German 14th Panzer and 1st Parachute Corps between them.[65] In addition, in their advance to the link-up, the South African Division had destroyed the German 65th Infantry Division.[65] After advancing through the Po River Valley, the division was assembled southwest of Treviso on 29 April and were instructed to move far to the west to garrison the city of Milan.[66]
General Mark Clark, the 15th Army Group commander, commented on the division's achievements during the Spring Offensive, stating:
It was a battle-wise outfit, bold and aggressive against the enemy, and willing to do whatever job was necessary. In fact, after a period of severe day and night fighting, the 6th had in an emergency gone into the line as infantrymen. When the snow stalled their armour they dug in their tanks and used them as artillery to make up for our shortage in heavy guns. Whenever I saw them, I was impressed by the large number of decorations and honours they had earned the hard way. Their attacks against strongly organised German positions were made with great élan and without regard for casualties. Despite their comparatively small numbers, they never complained about losses. Neither did Smuts, who made it clear that the Union of South Africa intended to do its part in the War – and it most certainly did. General Mark W. Clark, Calculated Risk. p. 391
End of the war
Axis surrender
Monza motor racing circuit on 14 July 1945 attended by Generals Clark (15th Army Group) and Truscott (5th Army) as well as commanders of numerous formations in the region. During this parade, numerous US awards were made to men within the division, including the rank of Commander of the Legion of Merit being awarded to General Poole.[69]
South African brigades were then deployed to the Swiss and French borders for frontier duties with 11 SA Armd Bde along the Swiss border, 13 Mot Bde around Turin, and 12 Mot Bde in the Aosta Valley contiguous to the Franco-Italian border which was drawn on the high ground separating the two countries.
Cremona and Mantova Battle Groups were placed under command of the division to assist in these duties, allowing some of the battalions to be withdrawn for repatriation to South Africa. The two motorised brigades were amalgamated and remained responsible for guarding duties in the province of Imperia until 18 August while the armoured brigade was amalgamated with the division artillery.[70]
Riots during demobilisation
Main article:
Helwan Riots (1945)
By the beginning of April 1945, it had become obvious that the war was coming to a close and that the division as well as many other South African troops serving as divisional, corps or army troops with other formations would require repatriation back to South Africa for demobilisation. On 1 May, the
2nd South African Infantry Division since the Sidi Rezegh and Tobruk battles in the western desert. Their numbers had not been factored into the demobilisation plans.[71]
The staging depot at Helwan north of Cairo was soon overcrowded and the number of troops being flown back to South Africa were substantially lower than had been planned. In addition, the expected shipping had been delayed. Food was in short supply and the standard of discipline deteriorated further as men arriving at the depot were split up alphabetically and were not retained in their unit structures.[71] A protest meeting was held on 20 August and as the size of the crowd increased, the meeting became more violent eventually resulting in the troops trashing, looting and burning numerous Egyptian premises, blocks of shops, motor cars, bungalows and book stalls as well as one of their own messes, and broke down and looted the NAAFI store. General Poole flew in from Italy to address the troops, promising that immediate steps were to be taken to speed up the rate of repatriation. Weeks later, the subsequent court of enquiry assessed the total cost of the damages at £22,768,431.[71]
By 25 January 1946, 101,676 men had been ferried back to South Africa[72] and the last aircraft left Egypt on 26 February 1946, carrying Major General Evered Poole who arrived in Durban on 2 March 1946.[73]
Casualties
General Poole gave the campaign statistics for South African casualties as follows: Killed: 711; Wounded: 2,675; Missing: 157; Total: 3,543.[k]
6th South African Armoured Division in Italy
Driver of the South African Cape Corps close to Bologna. 1944.
6 SA Armoured Division command staff in Bologna. Left to Right: Maj-Gen Poole, Brig. Furstenburg, Maj-Gen Theron.
Sherman Firefly tanks of Pretoria Regiment in Italy in 1944
Shermans passing a knocked-out German Sd.Kfz. 222 armoured car, 25 January 1944.
German paratroopers move a Pak-40 antitank gun into position: 23 February 1945.
^1st Infantry Division and 2nd Infantry Division.[1]
^The South African ORBAT dictated an infantry division as requiring 24,108 men, whilst an armoured division required 14,195 men based on the British ORBAT.[1]
^B Squadron of Prince Albert Guard (PAG) as well as C Squadron of Special Service Battalion (SSB) were Rhodesian armoured squadrons. The 17th Rhodesian Field Battery formed part of 1/6 Field Regiment and the Rhodesian 4th Anti-Tank Battery was re-designated as 1/22 Anti-Tank Battery within the division troops.[5]
^The division was considered to be the most highly trained South African division to date. Of the 14,000 men in the division, 3,500 wore the Africa Star ribbon with the Eighth Army clasp, yet after one year from its planned deployment date, the division was still in the Middle East. There was a feeling that the Eighth Army did not require any additional armoured units and further, that the Army command preferred the South Africans to take over the Middle East policing duties performed by an Indian Division, allowing the Indian unit to be broken up to reinforce Indian units already serving in Italy (4th and 8th Indian divisions). This was preferred rather than introducing yet another national division into the Eighth Army, further complicating the Army organisation.[8]
^Although Florence had been declared an open city and had been evacuated by the Germans, they continued to shell troops advancing into the city.[28]
^This fact is contested by the Māori Battalion of the 2nd New Zealand Division whose regimental history claims that they were the first Allied troops to enter Florence.[29]
^In addition to having lost troops withdrawn to support the Seventh Army landings, the U.S. Fifth Army then consisted of four infantry divisions (34th, 85th, 88th and 91st) and the U.S. 1st Armored Division. The addition of a Brazilian formation was discounted, as these troops were still undergoing training and the capabilities of the 92nd Negro Division which was on the way to Italy, was unknown. It was evident that in order to keep up with the British Eighth Army, the U.S. Fifth Army needed reinforcement. For this reason, the British XIII Corps was assigned from the Eighth to the Fifth Army and the South African Division was moved from XIII Corps to U.S. IV Corps (they in turn being replaced by the British 6th Armoured Division within XIII Corps) to add an additional armoured division to the Army. The 24th Guards Brigade remained with the South African Division in the transfer to the Fifth Army.[32]
^As part of this change, the division was further reinforced by the addition of a medium artillery regiment from 10th Army Group Royal Artillery, as well as the attachment of three American heavy guns and the Combat Command B, an armoured brigade from U.S. 1st Armored Division.[49]
^The official statistics compiled by the AG Stats department of the British War Office give total South African casualties in the Italian campaign as 4,168.[74]
^"South African Air Force". History of the South African Air Force. Department of Defence, Republic of South Africa. Archived from the original on 5 May 2012. Retrieved 29 October 2010.
^Jackson, Allan. "Facts about Durban". Flying Boat Eyewitnesses – 35 SQN Shuttle Service. Retrieved 29 October 2010.
Hinsley, F.H. (1988). British Intelligence in the Second World War: Its Influence on Strategy and Operations. Volume Three, Part II. HM Stationery Office.


 Driver of the South African Cape Corps close to Bologna. 1944.
 6 SA Armoured Division command staff in Bologna. Left to Right: Maj-Gen Poole, Brig. Furstenburg, Maj-Gen Theron.
 Sherman Firefly tanks of Pretoria Regiment in Italy in 1944
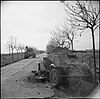 Shermans passing a knocked-out German Sd.Kfz. 222 armoured car, 25 January 1944.
 German paratroopers move a Pak-40 antitank gun into position: 23 February 1945.
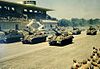 Victory Parade at Monza. 14 July 1945


