Accuracy and precision
Accuracy and precision are two measures of observational error.
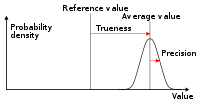
Accuracy is how close a given set of
Precision is how close the measurements are to each other.
In other words:
- More commonly, a description of true value. This secondary measure is referred to as trueness by ISO.
- A combination of both types of observational error (random and systematic), so high accuracy requires both high precision and high trueness.
In the first, more common definition of "accuracy" above, the concept is independent of "precision", so a particular set of data can be said to be accurate, precise, both, or neither.
In simpler terms, given a
Common technical definition

In the fields of
The field of
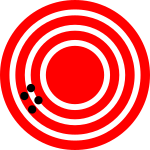
A measurement system can be accurate but not precise, precise but not accurate, neither, or both. For example, if an experiment contains a
A measurement system is considered valid if it is both accurate and precise. Related terms include bias (non-
The terminology is also applied to indirect measurements—that is, values obtained by a computational procedure from observed data.
In addition to accuracy and precision, measurements may also have a
In numerical analysis, accuracy is also the nearness of a calculation to the true value; while precision is the resolution of the representation, typically defined by the number of decimal or binary digits.
In military terms, accuracy refers primarily to the accuracy of fire (justesse de tir), the precision of fire expressed by the closeness of a grouping of shots at and around the centre of the target.[4]
Quantification
In industrial instrumentation, accuracy is the measurement tolerance, or transmission of the instrument and defines the limits of the errors made when the instrument is used in normal operating conditions.[5]
Ideally a measurement device is both accurate and precise, with measurements all close to and tightly clustered around the true value. The accuracy and precision of a measurement process is usually established by repeatedly measuring some
This also applies when measurements are repeated and averaged. In that case, the term
With regard to accuracy we can distinguish:
- the difference between the mean of the measurements and the reference value, the bias. Establishing and correcting for bias is necessary for calibration.
- the combined effect of that and precision.
A common convention in science and engineering is to express accuracy and/or precision implicitly by means of significant figures. Where not explicitly stated, the margin of error is understood to be one-half the value of the last significant place. For instance, a recording of 843.6 m, or 843.0 m, or 800.0 m would imply a margin of 0.05 m (the last significant place is the tenths place), while a recording of 843 m would imply a margin of error of 0.5 m (the last significant digits are the units).
A reading of 8,000 m, with trailing zeros and no decimal point, is ambiguous; the trailing zeros may or may not be intended as significant figures. To avoid this ambiguity, the number could be represented in scientific notation: 8.0 × 10³ m indicates that the first zero is significant (hence a margin of 50 m) while 8.000 × 10³ m indicates that all three zeros are significant, giving a margin of 0.5 m. Similarly, one can use a multiple of the basic measurement unit: 8.0 km is equivalent to 8.0 × 10³ m. It indicates a margin of 0.05 km (50 m). However, reliance on this convention can lead to false precision errors when accepting data from sources that do not obey it. For example, a source reporting a number like 153,753 with precision +/- 5,000 looks like it has precision +/- 0.5. Under the convention it would have been rounded to 150,000.
Alternatively, in a scientific context, if it is desired to indicate the margin of error with more precision, one can use a notation such as 7.54398(23) × 10−10 m, meaning a range of between 7.54375 and 7.54421 × 10⁻¹⁰ m.
Precision includes:
- repeatability — the variation arising when all efforts are made to keep conditions constant by using the same instrument and operator, and repeating during a short time period; and
- reproducibility — the variation arising using the same measurement process among different instruments and operators, and over longer time periods.
In engineering, precision is often taken as three times Standard Deviation of measurements taken, representing the range that 99.73% of measurements can occur within.[6] For example, an ergonomist measuring the human body can be confident that 99.73% of their extracted measurements fall within ± 0.7 cm - if using the GRYPHON processing system - or ± 13 cm - if using unprocessed data.[7]
ISO definition (ISO 5725)

A shift in the meaning of these terms appeared with the publication of the ISO 5725 series of standards in 1994, which is also reflected in the 2008 issue of the BIPM
According to ISO 5725-1,
ISO 5725-1 and VIM also avoid the use of the term "bias", previously specified in BS 5497-1,[8] because it has different connotations outside the fields of science and engineering, as in medicine and law.
In classification
In binary classification
Accuracy is also used as a statistical measure of how well a
In this context, the concepts of trueness and precision as defined by ISO 5725-1 are not applicable. One reason is that there is not a single “true value” of a quantity, but rather two possible true values for every case, while accuracy is an average across all cases and therefore takes into account both values. However, the term precision is used in this context to mean a different metric originating from the field of information retrieval (see below).
In multiclass classification
When computing accuracy in multiclass classification, accuracy is simply the fraction of correct classifications:[13]
Accuracy is also called top-1 accuracy to distinguish it from top-5 accuracy, common in convolutional neural network evaluation. To evaluate top-5 accuracy, the classifier must provide relative likelihoods for each class. When these are sorted, a classification is considered correct if the correct classification falls anywhere within the top 5 predictions made by the network. Top-5 accuracy was popularized by the ImageNet challenge. It is usually higher than top-1 accuracy, as any correct predictions in the 2nd through 5th positions will not improve the top-1 score, but do improve the top-5 score.
In psychometrics and psychophysics
In psychometrics and psychophysics, the term accuracy is interchangeably used with validity and constant error. Precision is a synonym for reliability and variable error. The validity of a measurement instrument or psychological test is established through experiment or correlation with behavior. Reliability is established with a variety of statistical techniques, classically through an internal consistency test like Cronbach's alpha to ensure sets of related questions have related responses, and then comparison of those related question between reference and target population.[citation needed]
In logic simulation
In
In information systems
Information retrieval systems, such as
None of these metrics take into account the ranking of results. Ranking is very important for web search engines because readers seldom go past the first page of results, and there are too many documents on the web to manually classify all of them as to whether they should be included or excluded from a given search. Adding a cutoff at a particular number of results takes ranking into account to some degree. The measure
In cognitive systems
In cognitive systems, accuracy and precision is used to characterize and measure results of a cognitive process performed by biological or artificial entities where a cognitive process is a transformation of data, information, knowledge, or wisdom to a higher-valued form. (
See also
- Bias-variance tradeoffin statistics and machine learning
- Accepted and experimental value
- Data quality
- Engineering tolerance
- Exactness (disambiguation)
- Experimental uncertainty analysis
- F-score
- Hypothesis tests for accuracy
- Information quality
- Measurement uncertainty
- Precision (statistics)
- Probability
- Random and systematic errors
- Sensitivity and specificity
- Significant figures
- Statistical significance
References
- ^ a b BS ISO 5725-1: "Accuracy (trueness and precision) of measurement methods and results - Part 1: General principles and definitions.", p.1 (1994)
- ^ a b c JCGM 200:2008 International vocabulary of metrology — Basic and general concepts and associated terms (VIM)
- ISBN 0-935702-75-X.
- ^ North Atlantic Treaty Organization, NATO Standardization Agency AAP-6 – Glossary of terms and definitions, p 43.
- ^ Creus, Antonio. Instrumentación Industrial[citation needed]
- OCLC 1246529321.
- PMID 34006206.
- ^ BS 5497-1: "Precision of test methods. Guide for the determination of repeatability and reproducibility for a standard test method." (1979)
- (PDF) from the original on 2022-10-09.
- ^ "Archived copy" (PDF). Archived from the original (PDF) on 2015-03-11. Retrieved 2015-08-09.
{{cite web}}: CS1 maint: archived copy as title (link) - arXiv:1503.06410 [cs.IR].
- ^ David M W Powers. "The Problem with Kappa" (PDF). Anthology.aclweb.org. Archived (PDF) from the original on 2022-10-09. Retrieved 11 December 2017.
- ^ "3.3. Metrics and scoring: quantifying the quality of predictions". scikit-learn. Retrieved 17 May 2022.
- ^ Acken, John M. (1997). "none". Encyclopedia of Computer Science and Technology. 36: 281–306.
- ^ Glasser, Mark; Mathews, Rob; Acken, John M. (June 1990). "1990 Workshop on Logic-Level Modelling for ASICS". SIGDA Newsletter. 20 (1).
- ISBN 978-0367859459.
- S2CID 195891648.
- S2CID 51603737.
External links
- BIPM - Guides in metrology, Guide to the Expression of Uncertainty in Measurement (GUM) and International Vocabulary of Metrology (VIM)
- "Beyond NIST Traceability: What really creates accuracy", Controlled Environments magazine
- Precision and Accuracy with Three Psychophysical Methods
- Appendix D.1: Terminology, Guidelines for Evaluating and Expressing the Uncertainty of NIST Measurement Results
- Accuracy and Precision
- Accuracy vs Precision — a brief video by Matt Parker
- What's the difference between accuracy and precision? by Matt Anticole at TED-Ed


