Hardness
In
Measures

There are three main types of hardness measurements: scratch, indentation, and rebound. Within each of these classes of measurement there are individual measurement scales. For practical reasons conversion tables are used to convert between one scale and another.
Scratch hardness
Scratch hardness is the measure of how resistant a sample is to
Another tool used to make these tests is the pocket hardness tester. This tool consists of a scale arm with graduated markings attached to a four-wheeled carriage. A scratch tool with a sharp rim is mounted at a predetermined angle to the testing surface. In order to use it a weight of known mass is added to the scale arm at one of the graduated markings, the tool is then drawn across the test surface. The use of the weight and markings allows a known pressure to be applied without the need for complicated machinery.[2]
Indentation hardness
Rebound hardness
Rebound hardness, also known as dynamic hardness, measures the height of the "bounce" of a diamond-tipped hammer dropped from a fixed height onto a material. This type of hardness is related to elasticity. The device used to take this measurement is known as a scleroscope.[3] Two scales that measures rebound hardness are the Leeb rebound hardness test and Bennett hardness scale. Ultrasonic Contact Impedance (UCI) method determines hardness by measuring the frequency of an oscillating rod. The rod consists of a metal shaft with vibrating element and a pyramid-shaped diamond mounted on one end.[4]
Hardening
There are five hardening processes:
In solid mechanics
In solid mechanics, solids generally have three responses to force, depending on the amount of force and the type of material:
- They exhibit elasticity—the ability to temporarily change shape, but return to the original shape when the pressure is removed. "Hardness" in the elastic range—a small temporary change in shape for a given force—is known as stiffness in the case of a given object, or a high elastic modulus in the case of a material.
- They exhibit stress-strain curve. This response produces the observed properties of scratch and indentation hardness, as described and measured in materials science. Some materials exhibit both elasticity and viscosity when undergoing plastic deformation; this is called viscoelasticity.
- They fracture—split into two or more pieces.
Brittleness, in technical usage, is the tendency of a material to fracture with very little or no detectable plastic deformation beforehand. Thus in technical terms, a material can be both brittle and strong. In everyday usage "brittleness" usually refers to the tendency to fracture under a small amount of force, which exhibits both brittleness and a lack of strength (in the technical sense). For perfectly brittle materials, yield strength and ultimate strength are the same, because they do not experience detectable plastic deformation. The opposite of brittleness is ductility.
The toughness of a material is the maximum amount of energy it can absorb before fracturing, which is different from the amount of force that can be applied. Toughness tends to be small for brittle materials, because elastic and plastic deformations allow materials to absorb large amounts of energy.
Hardness increases with decreasing
Hardness of a material to deformation is dependent on its microdurability or small-scale shear modulus in any direction, not to any rigidity or stiffness properties such as its bulk modulus or Young's modulus. Stiffness is often confused for hardness.[5][6] Some materials are stiffer than diamond (e.g. osmium) but are not harder, and are prone to spalling and flaking in squamose or acicular habits.
Mechanisms and theory

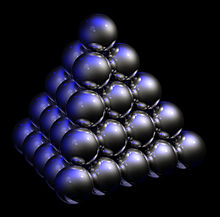
The key to understanding the mechanism behind hardness is understanding the metallic
There are two types of irregularities at the grain level of the microstructure that are responsible for the hardness of the material. These irregularities are point defects and line defects. A point defect is an irregularity located at a single lattice site inside of the overall three-dimensional lattice of the grain. There are three main point defects. If there is an atom missing from the array, a
In glasses, hardness seems to depend linearly on the number of topological constraints acting between the atoms of the network.[9] Hence, the rigidity theory has allowed predicting hardness values with respect to composition.

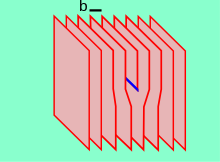
Dislocations provide a mechanism for planes of atoms to slip and thus a method for plastic or permanent deformation.[7] Planes of atoms can flip from one side of the dislocation to the other effectively allowing the dislocation to traverse through the material and the material to deform permanently. The movement allowed by these dislocations causes a decrease in the material's hardness.
The way to inhibit the movement of planes of atoms, and thus make them harder, involves the interaction of dislocations with each other and interstitial atoms. When a dislocation intersects with a second dislocation, it can no longer traverse through the crystal lattice. The intersection of dislocations creates an anchor point and does not allow the planes of atoms to continue to slip over one another[10] A dislocation can also be anchored by the interaction with interstitial atoms. If a dislocation comes in contact with two or more interstitial atoms, the slip of the planes will again be disrupted. The interstitial atoms create anchor points, or pinning points, in the same manner as intersecting dislocations.
By varying the presence of interstitial atoms and the density of dislocations, a particular metal's hardness can be controlled. Although seemingly counter-intuitive, as the density of dislocations increases, there are more intersections created and consequently more anchor points. Similarly, as more interstitial atoms are added, more pinning points that impede the movements of dislocations are formed. As a result, the more anchor points added, the harder the material will become.
Relation between hardness number and stress-strain curve
Careful note should be taken of the relationship between a hardness number and the stress-strain curve exhibited by the material. The latter, which is conventionally obtained via
However, while a hardness number thus depends on the stress-strain relationship, inferring the latter from the former is far from simple and is not attempted in any rigorous way during conventional hardness testing. (In fact, the
See also
|
|
References
- .
- ^ Hoffman Scratch Hardness Tester Archived 2014-03-23 at the Wayback Machine. byk.com
- ^ Allen, Robert (2006-12-10). "A guide to rebound hardness and scleroscope test". Archived from the original on 2012-07-18. Retrieved 2008-09-08.
- ^ "Novotest".
- ^ Jeandron, Michelle (2005-08-25). "Diamonds are not forever". Physics World. Archived from the original on 2009-02-15.
- .
- ^ a b Haasen, P. (1978). Physical metallurgy. Cambridge [Eng.] ; New York: Cambridge University Press.
- ^ Samuel, J. (2009). Introduction to materials science course manual. Madison, Wisconsin: University of Wisconsin-Madison.
- PMID 20867584.
- ISBN 0070377804.
- .
- .
- .
- .
- S2CID 245856672.
Further reading
- Chinn, R. L. (2009). "Hardness, bearings, and the Rockwells". Advanced Materials & Processes. 167 (10): 29–31.
- Davis, J. R. (Ed.). (2002). Surface hardening of steels: Understanding the basics. Materials Park, OH: ASM International.
- Dieter, George E. (1989). Mechanical Metallurgy. SI Metric Adaptation. Maidenhead, UK: McGraw-Hill Education. ISBN 0-07-100406-8
- Malzbender, J (2003). "Comment on hardness definitions". Journal of the European Ceramic Society. 23 (9): 9. .
- Revankar, G. (2003). "Introduction to hardness testing." Mechanical testing and evaluation, ASM Online Vol. 8.
