
Portal:Military history of Australia
Portal maintenance status: (April 2019)
automated editing software. Learn how to update the maintenance information here . |
Welcome to the Military history of Australia portal!
The The six British colonies in Australia participated in some of Britain's wars of the 19th century. In the early 20th century, as a federated dominion and later as an independent nation, Australia fought in the First World War and Second World War, as well as in the wars in Borneo and Vietnam during the Cold War. In the Post-Vietnam era Australian forces have been involved in numerous international peacekeeping missions, through the United Nations and other agencies, including in the Sinai, Persian Gulf, Rwanda, Somalia, East Timor and the Solomon Islands, as well as many overseas humanitarian relief operations, while more recently they have also fought as part of multi-lateral forces in Iraq and Afghanistan. In total, nearly 103,000 Australians died during these conflicts. (Full article... )
|


.jpg)
.jpg)
|
RAN • History |
 Good articles - load new batch
-
 Image 1Korean Demilitarised Zone. (Full article...)Image 2tactical strike aircraft, developed by General Dynamics to meet Australian requirements. The design was based on the F-111A model but included longer wings and strengthened undercarriage. The Australian government ordered 24 F-111Cs to equip the Royal Australian Air Force (RAAF) in 1963, but the aircraft were not delivered until 1973 because of long-running technical problems. During 1979 and 1980 four of these aircraft were converted to the RF-111C reconnaissance variant. Four ex–United States Air Force (USAF) F-111As were purchased by Australia and converted to F-111C standard in 1982 to replace F-111Cs destroyed during accidents. Australia also operated 15 F-111Gs between 1993 and 2007, mainly for conversion training. The RAAF retired its remaining F-111Cs in December 2010. In Australian military and aviation circles, the F-111 Aardvark was affectionately known as the "Pig", due to its long snout and terrain-following ability.)
The F-111Cs gave the RAAF a powerful strike capability but were never used in combat. The aircraft went through modernization programs in the 1980s and 1990s, and the RAAF acquired improved weapons to maintain their ability to penetrate hostile airspace. Despite this, by the 2000s the F-111Cs were becoming outdated and expensive to maintain, leading to a decision to retire them in 2010 rather than 2020 as originally planned. The F-111s were replaced by 24 Boeing F/A-18F Super Hornets pending delivery of F-35 Lightning IIs in development. (Full article...Image 3fissile core of a nuclear weapon was compressed by the high explosive shock wave; and Vixens investigated the effects of fire or non-nuclear explosions on atomic weapons. The minor trials, numbering around 550, ultimately generated far more contamination than the major tests.)
Operation Buffalo consisted of four tests; One Tree (12.9 kilotons of TNT (54 TJ)) and Breakaway (10.8 kilotons of TNT (45 TJ)) were detonated on towers, Marcoo (1.4 kilotons of TNT (5.9 TJ)) at ground level, and the Kite (2.9 kilotons of TNT (12 TJ)) was released by a Royal Air Force (RAF) Vickers Valiant bomber from a height of 11,000 metres (35,000 ft). This was the first drop of a British nuclear weapon from an aircraft. Operation Antler in 1957 tested new, light-weight nuclear weapons. Three tests were conducted in this series: Tadje (0.93 kilotons of TNT (3.9 TJ)), Biak (5.67 kilotons of TNT (23.7 TJ)) and Taranak (26.6 kilotons of TNT (111 TJ)). The first two were conducted from towers, while the last was suspended from balloons. Tadje used cobalt pellets as a tracer for determining yield, resulting in rumours that Britain was developing a cobalt bomb. (Full article...Image 4Second World War, was the German invasion of France, that notably introduced tactics that are still used. France and the Low Countries were conquered, ending land operations on the Western Front until the Normandy landings on 6 June 1944.)
On 3 September 1939, France declared war on Germany following the German invasion of Poland. In early September 1939, France began the limited Saar Offensive but by mid-October had withdrawn to their start lines. German armies invaded Belgium, Luxembourg, the Netherlands, and France on 10 May 1940. (Full article...Image 5Full article...)Image 6 CAC Winjeel prototype, No. 1 Basic Flying Training School, 1953
No. 1 Basic Flying Training School (No. 1 BFTS) was a flying training school of the Royal Australian Air Force (RAAF). Along with No. 1 Initial Flying Training School (No. 1 IFTS), it was formed in response to increased demand for aircrew during the Korean War and Malayan Emergency. No. 1 BFTS was established in December 1951 at RAAF Base Uranquinty, New South Wales, where it operated de Havilland Tiger Moths and CAC Wirraways. The school absorbed the activities of No. 1 IFTS in January 1955, as aircrew training requirements had eased following the end of the Korean War. No. 1 BFTS moved to RAAF Base Point Cook, Victoria, in May 1958, by which time it was exclusively flying CAC Winjeels. Its training program expanded in the mid-1960s owing to Australia's commitments in the Vietnam War. No. 1 BFTS was re-formed as No. 1 Flying Training School at Point Cook in January 1969. (Full article...)Image 7New Britain Campaign before being disbanded after the war.)
The squadron was re-raised in 1948 as the RAAF's bomber operational conversion unit. It has primarily served in this capacity since that time, though it has maintained a secondary strike capability and was also tasked with reconnaissance duties between 1979 and 1993. No. 6 Squadron is based at RAAF Base Amberley, Queensland, and was equipped with Boeing F/A-18F Super Hornet aircraft from January 2011 to December 2016. The squadron converted to Boeing EA-18G Growler electronic attack aircraft in 2017. (Full article...Image 8Finisterre Mountains where they later fought the Battle of Shaggy Ridge. After being withdrawn to Australia in mid-1944, the battalion did not take part in further fighting until the final months of the war when they were committed to the fighting on Balikpapan in July 1945. Following the conclusion of hostilities, the 2/10th Battalion was disbanded in December 1945. (Full article...)Image 9P-40 Kittyhawks, one of Lockheed Hudsons, and one of Bristol Beauforts. The wing's mainstay soon became the Beaufort, which eventually equipped five squadrons attached to the formation. No. 71 Wing took part in the New Guinea campaign under the auspices of No. 9 Group, before transferring to No. 10 Operational Group for the Western New Guinea campaign during 1944. It then returned to the control of Northern Command (formerly No. 9 Group) to support Australian ground forces in the Aitape–Wewak campaign, and completed its final combat mission only hours before the Japanese surrender in August 1945. No. 71 Wing remained in New Guinea following the war and was disbanded in January 1946. (Full article...)Image 10bombing and shelling by Australian and US air and naval forces. The Allied force totalled 33,000 personnel and was commanded by Major General Edward Milford, while the Japanese force, commanded by Rear Admiral Michiaki Kamada, numbered between 8,400 and 10,000, of which between 3,100 and 3,900 were combatants. After the initial landing, the Allies secured the town and its port, and then advanced along the coast and into the hinterland, capturing the two Japanese airfields. Major combat operations concluded around 21 July, but were followed by mopping-up operations, which lasted until the end of the war in mid-August. Australian troops remained in the area until early 1946. (Full article...)General images - load new batch
The following are images from various military history of Australia-related articles on Wikipedia.-
 Image 1HMAS Sydney leading HMAS Melbourne (from History of the Royal Australian Navy)
 -
 Image 2No. 80 Squadron aircraft at Noemfoor in November 1944 (from Military history of Australia during World War II)
 -
 Image 3Recruitment poster, 1914–1918. (from History of the Australian Army)
 -
 Image 4Australian sailors take possession of a midget submarine at a Japanese naval base near Tokyo in September 1945. (from History of the Royal Australian Navy)
 -
 Image 5North Africa showing the progress of Operation Compass and strategic locations (from Military history of Australia during World War II)
 -
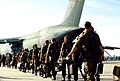 Image 6Australian engineers board the United StatesC-5 Galaxy aircraft which will transport them to Namibia (from History of the Australian Army)
 -
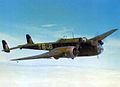 Image 7An Australian Hampden from No. 455 Squadron RAAF at RAF Leuchars in May 1942. (from History of the Royal Australian Air Force)
 -
 Image 8HMAS Hobart refuels from a US Navy tanker during Operation Sea Dragon off Vietnam in 1967. (from History of the Royal Australian Navy)
 -
 Image 9Australian soldiers in New Britain in 1945 (AWM 092342). (from History of the Australian Army)
 -
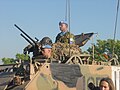 Image 10Australian troops in East Timor in May 2002 (from History of the Australian Army)
 -
 Image 11Fairey Firefly aircraft on board HMAS Sydney off Korea, during the Korean War. (from History of the Royal Australian Navy)
 -
 Image 12Australian light tanks and infantry in action at Buna (from Military history of Australia during World War II)
 -
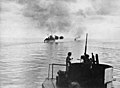 Image 13HMAS Australia and Arunta bombarding Cape Gloucester (from Military history of Australia during World War II)
 -
 Image 14The 10th Reinforcements of the 5th Pioneers at Port Melbourne prior to embarkation, October 1917 (from History of the Australian Army)
 -
 Image 15A patrol from the 2/13th Battalion at Tobruk (AWM 020779). (from History of the Australian Army)
 -
 Image 16Operation Cartwheel in New Guinea and western New Britain (from Military history of Australia during World War II)
 -
 Image 17Australian women were encouraged to participate in the war effort (from Military history of Australia during World War II)
 -
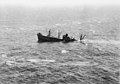 Image 18A liberty ship sinking after being attacked by I-21 near Port Macquarie in February 1943 (from Military history of Australia during World War II)
 -
 Image 19Infantry at Wide Bay in January 1945 (from Military history of Australia during World War II)
 -
 Image 2030 August 1945.Yokosuka Naval Base, Tokyo Bay. Commander Yuzo Tanno hands over the keys of Yokosuka Naval Base to Captain H. J. Buchanan, Royal Australian Navy. Buchanan led the first Commonwealth party to go ashore in Japan. (from History of the Royal Australian Navy)
 -
 Image 21Australian and Dutch POWs at Tarsau, Thailand in 1943. Australia declared war on Thailand on 2 March 1942 and an Australian–Thai Peace Treaty was signed on 3 April 1946. (from Military history of Australia during World War II)
 -
 Image 22An AIF recruiting poster (from Military history of Australia during World War II)
 -
 Image 23Australian and Japanese Army forces in New Guinea and the Solomon Islands in late 1944 (from Military history of Australia during World War II)
 -
 Image 24Central Bureau's headquarters building at Ascot in Brisbane (from Military history of Australia during World War II)
 -
-
 Image 26"He's coming south — It's fight, work or perish", a propaganda poster warning of the danger of Japanese invasion. (from Military history of Australia during World War II)
 -
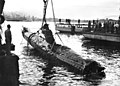 Image 27A JapaneseKo-hyoteki-class midget submarine, believed to be Midget No. 14, is raised from Sydney Harbour (from History of the Royal Australian Navy)
 -
 Image 28B-25 Mitchell bombers from No. 18 (NEI) Squadron near Darwin in 1943. This was one of three joint Australian-Dutch squadrons formed during the war. (from Military history of Australia during World War II)
 -
 Image 29HMAS Waterhen (from History of the Royal Australian Navy)
 -
 Image 30Women are expected to play a greater role in the RAN in the future (from History of the Royal Australian Navy)
 -
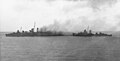 Image 31American destroyers evacuating the crew of HMAS Canberra after the Battle of Savo Island (from History of the Royal Australian Navy)
 -
 Image 32HMAS Anzac operating in support of Operation Enduring Freedom (from History of the Royal Australian Navy)
 -
 Image 33An aerial view of the second HMAS Australia – a heavy cruiser – passing through the Panama Canal in March 1935. Australia saw extensive combat in World War II. (from History of the Royal Australian Navy)
 -
 Image 34General Blamey signing the Japanese instrument of surrender on behalf of Australia (from Military history of Australia during World War II)
 -
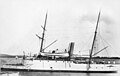
 Image 35HMAS Pioneer off East Africa in 1916 (from History of the Royal Australian Navy)
 -

-
 Image 37The wrecked German raider Emden (from History of the Royal Australian Navy)
 -
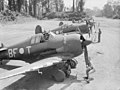 Image 38Australian-designed CAC Boomerang aircraft at Bougainville in early 1945 (from Military history of Australia during World War II)
 -
 Image 39Memorial to HMAS Sydney at the state war memorial in Western Australia (from History of the Royal Australian Navy)
 -
 Image 40Portside view of the Challenger-class light cruiser HMAS Encounter (from History of the Royal Australian Navy)
 -
 Image 41An Australian light machine gun team in action during the Aitape–Wewak campaign, June 1945. (from Military history of Australia during World War II)
 -
 Image 42Australian and British officers in South Africa during the Second Boer War (from History of the Australian Army)
 -
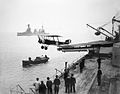 Image 43Abattle cruiser, in 1918. (from History of the Royal Australian Navy)
 -
 Image 44An Australian Halifax from No. 462 Squadron RAAF at RAF Foulsham in 1945. (from History of the Royal Australian Air Force)
 -
 Image 45An Australian Beaufighter flying over the Owen Stanley Range in New Guinea in 1942 (from History of the Royal Australian Air Force)
 -
 Image 46An Australian Flying Corps aircraft c. 1918 (from History of the Royal Australian Air Force)
 -
 Image 47A sailor from HMAS Adelaide inspecting a ship in the Persian Gulf during 2004 (from History of the Royal Australian Navy)
 -
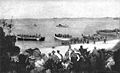 Image 48Australian soldiers landing at ANZAC Cove (from History of the Australian Army)
 -
 Image 49Members of No. 460 Squadron and the Lancaster bomber G for George in August 1943 (from Military history of Australia during World War II)
 -
 Image 50Women friends and family on the wharf waving farewell to the departing troop ship RMS Strathallan carrying the Advance Party of the 6th Division to service overseas. They include George Alan Vasey's wife Jessie Vasey (second from the left). The photograph is especially poignant because Vasey did not survive the war. (from Military history of Australia during World War II)
 -
 Image 51HMAS Anzac and HMAS Darwin with United States and British warships in late 2002 (from History of the Royal Australian Navy)
 -
 Image 52No. 453 Squadron Spitfires in Normandy during 1944. The aircraft are painted with invasion stripes. (from Military history of Australia during World War II)
 -
 Image 53Australian troops at Milne Bay (from Military history of Australia during World War II)
 -
 Image 54The Kokoda and Buna-Gona campaigns (from Military history of Australia during World War II)
 -
 Image 55Troops of the 2/16th Battalion disembark from Dakota aircraft at Kaiapit (from Military history of Australia during World War II)
 -
 Image 56The light cruiser HMAS Hobart showing torpedo damage inflicted by a Japanese submarine on 20 July 1943. Hobart did not return to service until December 1944. (from History of the Royal Australian Navy)
 -
 Image 57Australian soldiers in Somalia during Operation Solace (from History of the Australian Army)
 -
 Image 58Four members of the Australian contingent to Mission 204 inYunnan Province, China, during 1942 (from Military history of Australia during World War II)
 -
 Image 59A No. 10 Squadron Sunderland departing for a patrol over the Atlantic in 1941 (from Military history of Australia during World War II)
 -
 Image 60Australian soldiers display Japanese flags they captured at Kaiapit, New Guinea in 1943 (from History of the Australian Army)
 -
 Image 61HMAS Canberra entering Sydney Harbour in 1930 (from History of the Royal Australian Navy)
 -
 Image 62Australia on her side and sinking during her scuttling in April 1924 (from History of the Royal Australian Navy)
 -
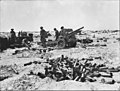 Image 63Guns of the 2/8th Field Regiment at El Alamein in July 1942 (from Military history of Australia during World War II)
 -
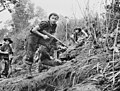 Image 64Commandos from the 2/3rd Independent Company in New Guinea during July 1943 (from Military history of Australia during World War II)
 -
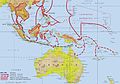 Image 65The Japanese advance through the Malay Barrier in 1941–1942 and feared offensive operations against Australia. (from Military history of Australia during World War II)
 -
 Image 66HMAS Melbourne steams into San Diego Harbor, California (USA), in 1977. (from History of the Royal Australian Navy)
 -
 Image 67MacArthur with Blamey and Prime Minister Curtin in March 1942 (from Military history of Australia during World War II)
 -
 Image 68The official welcome to the new units of the Royal Australian Navy (from History of the Royal Australian Navy)
 -
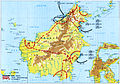 Image 69A map showing the progress of the Borneo campaign (from Military history of Australia during World War II)
 -
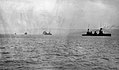 Image 70The Australian squadron entering Simpson Harbour, Rabaul, September 1914 (from History of the Royal Australian Navy)
 -
 Image 71Sailors from Sydney posing around and in the forward funnel shellhole (from History of the Royal Australian Navy)
 -
 Image 72HMAS Melbourne launches aGrumman S2G Tracker, 1980 (from History of the Royal Australian Navy)
 -
 Image 73Workers inspecting practice bombs at a factory in South Australia during 1943 (from Military history of Australia during World War II)
 -
 Image 74Soldiers from 3 RAR watch as a Korean village burns in late 1950 (from History of the Australian Army)
 -
 Image 75Australian troops land in Alexandria after their evacuation from Greece (from Military history of Australia during World War II)
 -
 Image 76Australian Army transport trucks move along the coast road in Lebanon during the Syria-Lebanon campaign. (from Military history of Australia during World War II)
 -
 Image 77Bartolomeo Colleoni sinking, 19 July 1940 (from History of the Royal Australian Navy)
 -
 Image 78HMAS Shropshire arriving in Sydney in November 1945 carrying long serving soldiers (from Military history of Australia during World War II)
 -
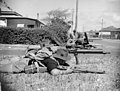 Image 79Australian soldiers exercising to defendGeraldton, Western Australia in October 1942 (from Military history of Australia during World War II)
 -
 Image 80Australians arrive atTan Son Nhut Airport, Saigon (from History of the Australian Army)
 -
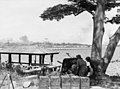 Image 81Australian anti-tank gunners overlooking theJohor Causeway between Singapore and Malaya in February 1942 (from Military history of Australia during World War II)
 -
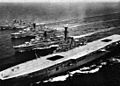 Image 82Melbourne with Vendetta, Voyager and Queenborough, circa 1962 (from History of the Royal Australian Navy)
 -
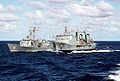 Image 83HMAS Success refuelling HMAS Canberra in 1988 (from History of the Royal Australian Navy)
 -
 Image 84HMAS Sheean at Fremantle Harbour (from History of the Royal Australian Navy)
 -
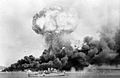 Image 85An oil storage tank explodes during the first Japanese air raid on Darwin on 19 February 1942 (from Military history of Australia during World War II)
 -
 Image 86Australian soldiers and local civilians on Labuan Island. The soldier on the left is armed with an Australian-designedOwen gun. (from Military history of Australia during World War II)
 -
 Image 87No. 3 SquadronP-51 Mustang fighters return from a raid over Northern Italy in May 1945 (from Military history of Australia during World War II)
 -

-
 Image 89Australian sailors with a Bathurst-class corvette in the background. The RAN commissioned 56 of this class of corvettes during World War II. (from History of the Royal Australian Navy)
 -
 Image 90The Japanese interpreter in charge of Australian POWs at Ambon arriving at Morotai in October 1945 (from Military history of Australia during World War II)
Daily unit article

The Australian 4th Battalion, which formed part of the Australian and New Zealand Army Corps, landing at Gallipoli on 25 April 1915 The
ANZAC which has since become a term, "Anzac", for a person from Australia or New Zealand.Selected quote
One cruiser sunk. Ammunition practically gone- — John Collins, July 17, 1940 after sinking the Italian cruiser Bartolomeo Colleoni
Related portals
WikiProjects

- History of Australia
- Military History
- Australian military history task force
Recognized content
Categories

Category puzzle Select [►] to view subcategoriesThings you can do
Associated WikiMedia
The following Wikimedia Foundation sister projects provide more on this subject:
-
 Commons
Free media repository -
 Wikibooks
Free textbooks and manuals -
 Wikidata
Free knowledge base -
 Wikinews
Free-content news -
 Wikiquote
Collection of quotations -
 Wikisource
Free-content library -
 Wikiversity
Free learning tools -
 Wiktionary
Dictionary and thesaurus
More portals
- P:ADF

.jpg)
.jpg)

.jpg)


_refuels_HMAS_Hobart_(D39)_off_Vietnam_in_1967.jpg)


.jpg)

.jpg)
.jpg)
.jpg)
.jpg)
.jpg)
.jpg)


.jpg)


.jpg)
.jpg)

.jpg)
.jpg)
,_drives_a_Rigid_Hull_Inflatible_Boat_(RHIB)_back_to_her_ship_after_making_a_passenger.jpg)
_with_US_destroyers_on_9_August_1942.jpg)

_passing_through_the_Panama_Canal_in_March_1935.jpg)

.jpg)
_cropped.jpg)


.jpg)
.jpg)


.jpg)

.jpeg)


_at_Espiritu_Santo_on_23_July_1943.jpg)

.jpg)
.jpg)


_San_Diego_1977.jpeg)
.jpg)


.jpg)


.jpg)
.jpg)


.jpg)
.jpg)

.jpg)
_with_destroyers_c1962.jpg)


.jpg)
.jpg)


