Second Australian Imperial Force
| Second Australian Imperial Force | |
|---|---|
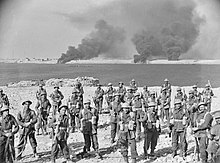
Gaza Airport in late 1942 | |
| Active | 1939–1947 |
| Country | Australia |
| Branch | Australian Army |
| Role | Expeditionary warfare |
| Size | 307,000 |
| Nickname(s) | 2nd AIF |
| Engagements | World War II
|
| Commanders | |
| Notable commanders | Sir Thomas Blamey |
The Second Australian Imperial Force (2nd AIF, or Second AIF) was the
Under the
Formation

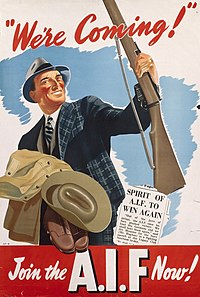
At the outset of World War II, there was controversy over whether Australia should concentrate on forming an expeditionary force for overseas service to fight Germany in Europe or a home defence force to fight Japan. Prime Minister Robert Menzies decided to do both, although the experience of the Great War indicated that Australia did not have the resources to do either.[1]
Conscription
On 15 September 1939, Menzies announced the formation of the Second AIF, an expeditionary force of 20,000, to consist of one infantry division and any auxiliary units that the Australian Army could fit into it. On 15 November 1939, Menzies announced the reintroduction of conscription for home defence service effective 1 January 1940. Unmarried men turning 21 in the year ending 30 June 1940 would be drafted into the Militia. Because of this, the AIF could not accept personnel who were in reserved occupations.[2]
Public opinion and the Australian Militia
Although the AIF had priority for scarce personnel and equipment over the Militia, many Militia commanders were reluctant to release any to the AIF. Although the government had hoped that half of the new force would be drawn from the Militia, it was soon clear that this would not be achieved. The public was torn between the dangers presented by Germany and Japan. After an initial rush, enlistments tapered off. For these reasons, the Second AIF possessed only one division, the
The fall of France
The
Organisation
Command

The 6th and 7th Divisions departed for the Far East in January 1942, followed by the 9th Division in February 1943. The last AIF units, three forestry companies, returned via the United States in late 1943.[6][7] All units of the Second AIF were thereafter deployed to the South West Pacific theatre, although some individuals remained in other theatres on exchange or liaison duty, such as Vernon Sturdee, who was head of the Australian Military Mission in Washington, D.C. from 1942 to 1944.[8]
A controversial decision of the Menzies government was that senior commands in Blamey's
Structure
The Second AIF's main strength consisted of a Corps Headquarters and five divisions:[13][14][15][16]
Divisions numbered 1st to 5th were Militia divisions, which had been raised during the inter-war years and perpetuated the numerical designations of the First AIF units that had fought during the First World War. In addition, the 10th through 12th and the 2nd and 3rd Armoured Divisions were also Militia formations.[13][14][15][16]

There were three brigades in each division. Brigades were numbered from 16 onwards so as not to be confused with extant Militia brigades. There were at first four infantry battalions per brigade but this was soon reduced to three.[17]
Units of the Second AIF prefixed their numbers with a '2/' (pronounced 'second') to distinguish themselves from Militia units. Where such a unit did not exist in the First AIF or the Militia, the '2/' was not initially used, but later it was adopted as identifying a unit of the Second AIF.[18]
After the war with Japan began, large numbers of experienced AIF officers were posted to Militia units. As a consequence, units in which more than 75% of their personnel were AIF volunteers were permitted to call themselves AIF units. By November 1944, 20 of the Militia's 33 infantry battalions were entitled to call themselves AIF. At this time the Army was 423,000 strong, of whom 25,000 were women, and 307,000 were members of the AIF.[19]
In the South West Pacific, the Army found that its force structure was unbalanced, with a preponderance of operational units and a grave shortage of logistical units. The Army was also faced with government requests to release manpower to industry, and later to discharge long-serving personnel. This was remedied by disbanding operational units.[20]
From 1 May 1945, the Army's monthly quota was 420 men and 925 women. As its wastage was greater than this, units were disbanded for reinforcements.[21]
Weaponry and equipment
Unlike in 1914, Australia did not possess a stock of modern weapons and equipment at the outbreak of the war. As in 1914, the
Armour
The
Personnel

Personnel were required to be between 20 and 35 years old on enlistment, although there were many cases of this being evaded. A large number of personnel were aged 20 on enlistment, and many former members of the First AIF joined up, a practice encouraged by some unit commanders, who liked to have some old hands around.[24]
Pay
Although volunteer militiamen were paid 8s per day, an unmarried private in the AIF was paid 5s per day in Australia, with an extra 2s per day after embarkation for overseas. This was less than the 8s 6d per day
Serial numbers
All members of the Second AIF were allocated a serial number. The first letter represented the state of enlistment: N – New South Wales; V – Victoria; Q – Queensland; S – South Australia; W – Western Australia; T – Tasmania; D ("Darwin") – Northern Territory; P - Papua New Guinea. The serial numbers of female soldiers followed this with an F. AIF serial numbers then had an X. A low number indicated an early enlistment. General Blamey was VX1. Soldiers transferring from the Militia often kept their old number with 100,000 added, while PMF officers had 20,000 added.[26]
Women in the AIF
From the first, women served with the AIF in the Australian Army Nursing Service. The Australian Army Medical Women's Service was formed in 1942, and the Australian Women's Army Service on 13 August 1941. The latter had a strength of 24,000. Some 35,000 women served in the Army, making up about 5% of the force.[27]
Uniforms and insignia
Shoulder patches
Units wore the shoulder patch of the corresponding unit of the First AIF, with a grey border to distinguish the unit from the Militia unit wearing the same patch. The shape of the grey indicated the division, which sometimes differed from that of the coloured part. Later, AIF personnel in Militia units were authorised to wear the grey border, resulting in some units wearing the same patches. The 9th Division replaced all its patches with a new type in the shape of a "T". As there were more units in the Second AIF than the First, many units wore patches of a new design.[28]
-
17th Battalion 1921–1944
-
2/17th Battalion 1940–1942
-
2/17th Battalion 1942–1946
Operations
The 6th Division, under
After refitting in Syria, the 6th Division was recalled to Australia to take part in the
When the remainder of the 6th Division returned, it was committed to the fighting in New Guinea.

The 7th Division, under
Following the outbreak of war in the Pacific, elements of the 7th Division were sent to the
Most of the 8th Division was sent to
A small, lesser-known force known as Mission 204 was drawn from units in Malaya, including forty men of the 8th Division. It served in China, advising the Chinese Army, until it was withdrawn in October 1942.[45]

The 23rd Infantry Brigade remained, but without battalions, as these had been lost when
Australian prisoners of war, like other Allied prisoners of the Japanese, were often held in inhumane conditions, such as Changi Prison or in Japan. Some were subject to forced labour, including the Burma Railway or forced long distance marches, such as on Sandakan.[51]
AIF
The 9th Division fought in the
The 9th also served with distinction at the First and Second Battles of El Alamein.[54] It returned to Australia in early 1943 in a convoy operation designated Operation Pamphlet.[55]
In 1943, the 6th, 7th and 9th Divisions were reunited on the Atherton Tableland.[56]
General

MacArthur deployed the AIF divisions in secondary assignments during 1944–45, where they often fought what many considered to be pointless battles. A shortage of first operational units and then logistic units caused the 6th Division, now under
A planned invasion of the Japanese home island of
Disbandment
Most Second AIF personnel were demobilised by the end of 1946. The Second AIF ceased to exist on 30 June 1947. All Second AIF personnel still on full-time duty were transferred to the Interim Army on 1 July 1947; this force was used to form the foundation of the Australian Regular Army in 1948.[61]
References
Citations
- ^ Long, To Benghazi, pp. 33–39
- ^ Long, To Benghazi, p. 39
- ^ Long, To Benghazi, p. 61
- ^ Long, To Benghazi, pp. 86–87
- ^ Maughan, Tobruk and El Alamein, pp. 380–382
- Sydney Morning Herald. 2 October 1943.
- ^ "Forestry Unit Back from Scotland". The Herald (Melbourne). 8 November 1943.
- ^ McCarthy, South West Pacific Area – First Year, p. 140
- ^ John Lavarack to Gavin Long, 6 August 1953, AWM93 50/2/23/63
- ^ Long, To Benghazi, p. 84
- ^ Wigmore, The Japanese Thrust, p. 32
- ^ Maughan, Tobruk and El Alamein, p. 8
- ^ a b Johnston, The Australian Army in World War II, p. 6
- ^ a b Lambert, The Birth, Life and Death of the 1st Australian Armoured Division
- ^ a b Hopkins, Australian Armour: A History of the Royal Australian Armoured Corps 1927–1972, p. 104
- ^ a b Kuring, Redcoats to Cams, p. 138
- ^ Burness, The Battle of Bardia, p. 27
- ^ Long, To Benghazi, p. 51
- ^ Long, The Final Campaigns, pp. 19–20
- ^ Long, The Final Campaigns, pp. 34–81
- ^ Long, The Final Campaigns, pp. 30–34
- ^ Long, To Benghazi, pp. 40–41, 53, 88
- ^ Hopkins, Australian Armour: A History of the Royal Australian Armoured Corps 1927–1972, pp. 39–47
- ^ Long, To Benghazi, p. 58
- ^ Long, To Benghazi, p. 66
- ^ Long, To Benghazi, p. 63
- ^ Bomford, Soldiers of the Queen, pp. 5–6
- ^ Glyde, Distinguishing Colour Patches of the Australian Military Forces 1915–1951: A Reference Guide, pp. 17–23
- ^ Long, To Benghazi, pp. 163–304
- ^ Long, Greece, Crete and Syria, p. 316
- ^ Long, Greece, Crete and Syria, p. 550
- ^ McCarthy, South–West Pacific Area – First Year: Kokoda to Wau, pp. 77–79, 118–119
- ^ McCarthy, South–West Pacific Area – First Year: Kokoda to Wau, pp. 8, 15, 21, 25–26
- ^ Long, Greece, Crete and Syria, p. 244
- ^ Long, Greece, Crete and Syria, pp. 244–449
- ^ McCarthy, South–West Pacific Area – First Year: Kokoda to Wau, pp. 543–578
- ^ Long, Greece, Crete and Syria, pp. 333–522
- ^ Maughan, Tobruk and El Alamein, pp. 101–375
- ^ Wigmore, The Japanese Thrust, pp. 447–457
- ^ Johnston, The Silent 7th, p. 250
- ^ Wigmore, The Japanese Thrust, pp. 28–61
- ^ Wigmore, The Japanese Thrust, p. 382
- ^ Wigmore, The Japanese Thrust, pp. 650–652
- ^ Morgan, A Burning Legacy: The Broken 8th Division
- ^ Wigmore, The Japanese Thrust, pp. 643–645
- ^ Wigmore, The Japanese Thrust, pp. 418–441
- ^ Wigmore, The Japanese Thrust, pp. 392–417
- ^ Wigmore, The Japanese Thrust, pp. 466–494
- ^ Wigmore, The Japanese Thrust, p. 490
- ^ NAA (ACT) A2653/1 M246/1945
- ^ Wigmore, The Japanese Thrust, pp. 511–642
- ^ Dennis et al, The Oxford Companion to Australian Military History, pp. 308–309
- ^ Maughan, Tobruk and El Alamein, p. 210
- ^ Maughan, Tobruk and El Alamein pp. 542–746
- ^ Maughan, Tobruk and El Alamein, pp. 748–754
- ^ Dexter, The New Guinea Offensives, pp. 15–17
- ^ Dexter, The New Guinea Offensives, pp. 326–762
- ^ Long, The Final Campaigns, pp. 271–387
- ^ Long, The Final Campaigns, pp. 388–583
- ^ Robertson, Australia at War, 1939–1945, p. 196
- ^ Sligo, The Development of the Australian Regular Army 1944–1952, pp. 45–46
Sources
- Bomford, Janette (2001). Soldiers of the Queen: Women in the Australian Army. Australian Army History Series. ISBN 9780195514070.
- Burness, Peter (2007). "The Battle of Bardia". Wartime (37). Canberra, Australian Capital Territory: Australian War Memorial: 26–29. ISSN 1328-2727.
- Dennis, Peter; Grey, Jeffrey; Morris, Ewan; Prior, Robin (1995). The Oxford Companion to Australian Military History (1st ed.). Melbourne, Victoria: Oxford University Press. ISBN 0-19-553227-9.
- Dexter, David (1961). The New Guinea Offensives. OCLC 2028994.
- Glyde, Ken (1999). Distinguishing Colour Patches of the Australian Military Forces 1915–1951: A Reference Guide. Claremont, Tasmania: Ken Glyde.
- ISBN 0-642-99407-2.
- ISBN 1-74114-191-5.
- Johnston, Mark (2007). The Australian Army in World War II. Elite. Martin Windrow (consultant editor). Oxford, England: Osprey Publishing. ISBN 978-1-84603-123-6.
- Kuring, Ian (2004). Redcoats to Cams: A History of Australian Infantry 1788–2001. Loftus, New South Wales: Australian Military History Publications. ISBN 1-876439-99-8.
- Lambert, Zach (2012). "The Birth, Life and Death of the 1st Australian Armoured Division" (PDF). Australian Army Journal. IX (1). Canberra, ACT: Land Warfare Studies Centre: 89–103. ISSN 1448-2843. Archived from the original(PDF) on 2 November 2013.
- OCLC 18400892.
- Long, Gavin (1953). Greece, Crete and Syria. Australia in the War of 1939–1945. Series 1 – Army. Vol. 2. Canberra, ACT: Australian War Memorial. OCLC 3134080.
- Long, Gavin (1963). The Final Campaigns. Australia in the War of 1939–1945. Series 1 – Army. Vol. 7 (1st ed.). Canberra, ACT: Australian War Memorial. OCLC 1297619.
- Maughan, Barton (1966). Tobruk and El Alamein. Australia in the War of 1939–1945. Series 1 – Army. Vol. 3. Canberra, ACT: Australian War Memorial. OCLC 954993.
- McCarthy, Dudley (1959). South-West Pacific Area – First Year. Australia in the War of 1939–1945. Series 1 – Army. Vol. 5. Canberra, ACT: Australian War Memorial. OCLC 3134247.
- Morgan, Joseph (2013). "A Burning Legacy: The Broken 8th Division". Sabretache. LIV (3, September). Military Historical Society of Australia: 4–14. ISSN 0048-8933.
- Robertson, John (1981). Australia at War, 1939–1945. Melbourne, Victoria: Heinemann. ISBN 978-0-85561-046-3.
- Sligo, MAJ Graeme (1997). "The Development of the Australian Regular Army 1944–1952". In Dennis, Peter; Grey, Jeffrey (eds.). The Second Fifty Years: The Australian Army 1947–1997. Canberra, ACT: School of History, University College, University of New South Wales, Australian Defence Force Academy.
- Wigmore, Lionel (1957). The Japanese Thrust. Australia in the War of 1939–1945. Series 1 – Army. Vol. 4. Canberra, ACT: Australian War Memorial. OCLC 3134219.
External links
- World War II Nominal Roll Archived 5 January 2020 at the Wayback Machine
- Unit Colour Patches May 1941


