
Search results
There is a page named "Omega Chess" on Wikipedia
- Chess Board)columns, are used in Omega Chess and Grand Chess; Omega Chess has four additional squares, one in each corner of the board. Los Alamos chess uses a smaller...17 KB (2,120 words) - 01:34, 16 May 2024
 Three-dimensional chess (or 3‑D chess) is any chess variant that replaces the two-dimensional board with a three-dimensional array of cells between which...17 KB (1,817 words) - 22:11, 17 May 2024
 - Dark Omega chess – combination of Omega Chess and dark chess. Dark Seirawan chess – combination of Seirawan chess and dark chess. Dark chess has a strong...6 KB (750 words) - 03:27, 2 March 2024
- Variations on the Old Game". The New York Times. Retrieved 2009-10-12. "Omega chess" DAN+, Different Augmented Knights by Ralph Betza, The Chess Variant Pages...4 KB (446 words) - 16:57, 30 April 2024
- Thai Chess)Makruk (Thai: หมากรุก; RTGS: mak ruk; pronounced [màːk rúk]), or Thai chess (Thai: หมากรุกไทย; RTGS: mak ruk thai; pronounced [màːk rúk tʰaj]), is a strategy...17 KB (1,491 words) - 08:16, 3 February 2024
 A chess variant is a game related to, derived from, or inspired by chess. Such variants can differ from chess in many different ways. "International"...20 KB (1,985 words) - 15:51, 13 October 2023
 notation to describe chess moves. Fischer random chess, also known as Chess960 ('chess nine-sixty'), is a variation of the game of chess invented by the former...62 KB (7,378 words) - 11:06, 2 July 2024
 - Korean chess)sometimes called Korean chess, is a strategy board game popular on the Korean Peninsula. The game was derived from xiangqi (Chinese chess), and is very similar...22 KB (2,398 words) - 01:43, 27 June 2024
 Bughouse chess (also known as exchange chess, Siamese chess (but not to be confused with Thai chess), tandem chess, transfer chess, double bughouse, doubles...32 KB (4,055 words) - 23:25, 22 June 2024
 - Capablanca chess (or Capablanca's chess) is a chess variant invented in the 1920s by World Chess Champion José Raúl Capablanca. It incorporates two new...17 KB (1,969 words) - 21:55, 6 March 2024
 Masonic Chess: Every other board rank is indented. Same as chess, with moves adapted to the new brickwork-like board. By George Dekle Sr. Omega chess: On...98 KB (10,505 words) - 19:31, 20 June 2024
 commonly used chess pieces that, like chancellor, begin with C (e.g. the cannon in xiangqi, the camel in Tamerlane Chess, the champion in Omega Chess, and the...9 KB (1,008 words) - 02:54, 17 June 2024
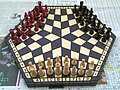
- Chinese chess)Wade–Giles: Hsiang ch'i; English: /ˈʃɑːŋtʃi/), commonly known as Chinese chess or elephant chess, is a strategy board game for two players. It is the most popular...82 KB (9,945 words) - 00:59, 20 June 2024Hexagonal chess is a group of chess variants played on boards composed of hexagon cells. The best known is Gliński's variant, played on a symmetric 91-cell...37 KB (4,496 words) - 00:40, 22 June 2024
- Dice chess can refer to a number of chess variants in which dice are used to alter gameplay; specifically that the moves available to each player are determined...7 KB (977 words) - 21:26, 12 July 2023


- Derangement of So-Called Chess Critics and their Treatment by Wilhelm Steinitz "Something is rotten in the State" of Chess. That our glorious game which
- proficiency are, as it is now not difficult to see, the real Alpha and Omega of Franklin's ethic, as expressed in the passages we have quoted, as well
- Eurasian Chess Grand Chess Modern Chess Omega Chess Wildebeest Chess Multi-Player Variants Bughouse Chess Four-Player Chess Three-Man Chess Historical Variants