
Portal:Military history of Australia
Portal maintenance status: (April 2019)
automated editing software. Learn how to update the maintenance information here . |
Welcome to the Military history of Australia portal!
The The six British colonies in Australia participated in some of Britain's wars of the 19th century. In the early 20th century, as a federated dominion and later as an independent nation, Australia fought in the First World War and Second World War, as well as in the wars in Borneo and Vietnam during the Cold War. In the Post-Vietnam era Australian forces have been involved in numerous international peacekeeping missions, through the United Nations and other agencies, including in the Sinai, Persian Gulf, Rwanda, Somalia, East Timor and the Solomon Islands, as well as many overseas humanitarian relief operations, while more recently they have also fought as part of multi-lateral forces in Iraq and Afghanistan. In total, nearly 103,000 Australians died during these conflicts. (Full article... )
|


.jpg)

.jpg)

|
RAN • History |
 Good articles - load new batch
-
 Image 1Gallipoli Campaign between April and December 1915.)
At Gallipoli, the division landed at Anzac Cove on 25 April 1915, coming ashore as follow-on troops to the initial assault force that had made it ashore earlier in the day, and later occupied the northern areas of the Allied lodgement. After the initial Allied assault at Anzac Cove, elements of the division were sent to Cape Helles in early May, where they participated in the Second Battle of Krithia, launching an unsuccessful attack towards the Achi Baba peak. The division's mounted units were sent to Gallipoli in mid-May without their horses, to serve as dismounted infantry, making up for previous losses. Later that month, the division helped repel an Ottoman counter-attack at Anzac Cove, after which it occupied the line until August, when the Allies launched an offensive designed to break the deadlock. During this period, the division attacked Chunuk Bair and Hill 971, and then later Hill 60. These efforts failed, and as winter set in on the peninsula, the division was evacuated from Gallipoli in mid-December 1915 as part of a general Allied withdrawal. (Full article...Image 2Bougainville Campaign of the Pacific theatre, the battle was fought in the southern sector of Bougainville Island. Coming after the Battle of Slater's Knoll in which a strong Japanese counterattack was defeated, the battle occurred in two distinct periods between 17 April and 22 May 1945, as elements of the Australian 15th Brigade advanced south along the Buin Road.)
The initial phase saw the Australians advance towards the Hongorai River. Following the end of the early fighting, the Australian advance towards the main Japanese concentration at Buin continued as they struck out towards the Hari and Mivo Rivers. This continued until torrential rain and flooding brought the advance to a halt short of the objective, washing away many bridges and roads upon which the Australians relied for supplies. As the Australian advance stalled, the Japanese began harassing the Australian line of communications, and as the rain stopped and the flooding subsided in late-July and into August, the Australians began making preparations to resume the advance towards Buin again. Ultimately, though, the war came to an end before the final Australian advance began, bringing the campaign to an end. (Full article...Image 3FRAeS (17 November 1891 – 21 April 1963) was a senior engineer and aviator in the Royal Australian Air Force (RAAF). He accompanied Henry Wrigley on the first trans-Australia flight from Melbourne to Darwin in 1919, a feat that earned both men the Air Force Cross. Murphy later played a leading role in military aircraft maintenance and production.)
A veteran of World War I, Murphy served first as a mechanic and then as a pilot with the Australian Flying Corps. Based in the Middle East, he flew with No. 1 Squadron and was awarded the Distinguished Flying Cross. Murphy was the first airman on the RAAF's strength when it formed in 1921, and rose to the rank of temporary air commodore during World War II, commanding No. 1 Aircraft Depot and, later, No. 4 Maintenance Group. He was also the RAAF's first Inspector of Air Accidents. A fellow of the Royal Aeronautical Society, Murphy retired from the military in 1946, and died in 1963 aged seventy-one. (Full article...Image 4
No. 78 Squadron Kittyhawks in late 1944 No. 78 Squadron Kittyhawks in late 1944
No. 78 Squadron was a Royal Australian Air Force (RAAF) fighter squadron of World War II. It was formed in July 1943 as part of expansion of the RAAF's fighter force, and was assigned to mobile striking forces for the duration of the war.
After completing training, No. 78 Squadron was deployed to the combat zone north of Australia in October 1943. From November that year until September 1944 the squadron supported the advance of the Allied ground forces through western New Britain and the north coast of New Guinea by attacking Japanese positions, providing fighter protection for recently established beachheads, and escorting Australian and United States bombers. From late 1944 until mid-1945 it operated against Japanese positions and shipping in the eastern Netherlands East Indies. The squadron took part in the Borneo campaign during the final weeks of the war. No. 78 Squadron was reduced to a cadre after it returned to Australia in December 1945, but received new aircraft in 1946 and undertook training exercises until being disbanded in April 1948. (Full article...)Image 5)Colombo International Airport, Ratmalana in Ceylon during the London-to-Christchurch air race
No. 1 Long Range Flight was a temporary Royal Australian Air Force unit formed to participate in the 1953 London-to-Christchurch air race (also known as the Christchurch Centenary air race). The flight was established in February 1953 and was equipped with three Canberra bombers, specially modified between June and August. Following extensive training, two Canberras departed for the UK in mid-September. The race began on 9 October, and one of the flight's aircraft placed second, with a total flying time of 22 hours and 29 minutes. The other aircraft was forced out of the race when one of its tyres burst while landing at Cocos Island to refuel, but completed its flight to Christchurch after being repaired. After a brief period in New Zealand both aircraft returned to Australia to be modified back to a standard configuration, and the flight was disbanded in November. (Full article...Image 6Binh Duong Province, 30 kilometres (19 mi) north-west of Bien Hoa airbase. During the fighting, soldiers from the US 1st Brigade, 1st Infantry Division and the 1st Battalion, Royal Australian Regiment (1 RAR), which had been attached for the operation, fought off a regimental-sized Viet Cong night assault. Repulsed by massed firepower from artillery and tanks, the Viet Cong suffered heavy casualties and were forced to withdraw by morning. After the attack, the Americans and Australians made no attempt to pursue the Viet Cong, focusing on securing the battlefield and evacuating their own casualties. The Viet Cong continued to harass the American sappers with occasional sniper and mortar fire, but these tactics proved ineffective, and the road was completed by 2 March. (Full article...)Image 7the Sinai and Palestine.The AIF included the Australian Flying Corps (AFC), the predecessor to the Royal Australian Air Force, which consisted of four combat and four training squadrons that were deployed to the United Kingdom, the Western Front and the Middle East throughout the war. (Full article...)Image 8 457 Squadron badge
No. 457 Squadron was a Royal Australian Air Force (RAAF) fighter squadron of World War II. Equipped with Supermarine Spitfire fighters, it was formed in England during June 1941 under Article XV of the Empire Air Training Scheme. The squadron was transferred to Australia in June 1942 and saw combat in the South West Pacific Area before being disbanded in November 1945.
The squadron saw combat against both Nazi Germany and the Empire of Japan during the war. From March to May 1942 it was based in southern England and flew missions over German-occupied France during which it shot down at least five Luftwaffe aircraft. After being deployed to Australia, No. 457 Squadron was based near Darwin as part of No. 1 Wing RAAF and intercepted several Japanese raids on Allied bases in northern Australia between March and November 1943. The squadron remained at Darwin and saw almost no combat during 1944, but moved to Morotai and later Labuan in 1945 from where it attacked Japanese positions in the Netherlands East Indies and Borneo as part of Allied offensives in these areas. (Full article...)Image 9No. 418 Squadron RCAF, Scherf was credited with the destruction of 7½ aircraft in the air and on the ground, and awarded the Distinguished Flying Cross. Afterward, he was posted for duties with Headquarters Air Defence of Great Britain. He nevertheless returned occasionally to No. 418 Squadron and flew operational sorties with the unit, destroying a further 16 aircraft and earning two more decorations. By the end of the war, Scherf had achieved 14½ aerial victories in 38 operational sorties. He was also credited with destroying nine aircraft on the ground, and with damaging seven others. (Full article...)Image 10North-Eastern Area Command. Led by Group Captain Charles Eaton, the wing soon deployed to Merauke, Dutch New Guinea, where it comprised three squadrons flying CAC Boomerang and P-40 Kittyhawk fighters, and A-31 Vengeance dive bombers. Eaton was succeeded by Group Captain Allan Walters in mid-1943. No. 72 Wing took part in the defence of Torres Strait, undertaking interception, patrol and occasional ground-attack and anti-shipping duties. By July 1944, its original squadrons had all been disbanded or transferred to other operational formations. No. 120 (Netherlands East Indies) Squadron, which had arrived in May 1944, operating Kittyhawks, remained at Merauke until February 1945. The wing headquarters returned to Australia that May, and disbanded the following month. (Full article...)General images - load new batch
The following are images from various military history of Australia-related articles on Wikipedia.-
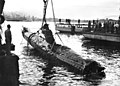 Image 1A JapaneseKo-hyoteki-class midget submarine, believed to be Midget No. 14, is raised from Sydney Harbour (from History of the Royal Australian Navy)
 -
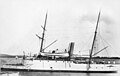
 Image 2HMAS Waterhen (from History of the Royal Australian Navy)
 -
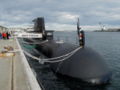 Image 3HMAS Sheean at Fremantle Harbour (from History of the Royal Australian Navy)
 -
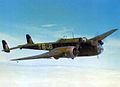 Image 4An Australian Hampden from No. 455 Squadron RAAF at RAF Leuchars in May 1942. (from History of the Royal Australian Air Force)
 -
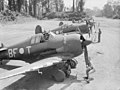 Image 5Australian-designed CAC Boomerang aircraft at Bougainville in early 1945 (from Military history of Australia during World War II)
 -
 Image 6Australian and Japanese Army forces in New Guinea and the Solomon Islands in late 1944 (from Military history of Australia during World War II)
 -
 Image 7No. 453 Squadron Spitfires in Normandy during 1944. The aircraft are painted with invasion stripes. (from Military history of Australia during World War II)
 -
 Image 8The light cruiser HMAS Hobart showing torpedo damage inflicted by a Japanese submarine on 20 July 1943. Hobart did not return to service until December 1944. (from History of the Royal Australian Navy)
 -
 Image 9Australian Army transport trucks move along the coast road in Lebanon during the Syria-Lebanon campaign. (from Military history of Australia during World War II)
 -
 Image 10A patrol from the 2/13th Battalion at Tobruk (AWM 020779). (from History of the Australian Army)
 -
 Image 11Women friends and family on the wharf waving farewell to the departing troop ship RMS Strathallan carrying the Advance Party of the 6th Division to service overseas. They include George Alan Vasey's wife Jessie Vasey (second from the left). The photograph is especially poignant because Vasey did not survive the war. (from Military history of Australia during World War II)
 -
 Image 12Australian sailors with a Bathurst-class corvette in the background. The RAN commissioned 56 of this class of corvettes during World War II. (from History of the Royal Australian Navy)
 -
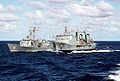 Image 13HMAS Success refuelling HMAS Canberra in 1988 (from History of the Royal Australian Navy)
 -
 Image 14B-25 Mitchell bombers from No. 18 (NEI) Squadron near Darwin in 1943. This was one of three joint Australian-Dutch squadrons formed during the war. (from Military history of Australia during World War II)
 -
 Image 15Bartolomeo Colleoni sinking, 19 July 1940 (from History of the Royal Australian Navy)
 -
 Image 16The official welcome to the new units of the Royal Australian Navy (from History of the Royal Australian Navy)
 -
 Image 17No. 3 SquadronP-51 Mustang fighters return from a raid over Northern Italy in May 1945 (from Military history of Australia during World War II)
 -
 Image 1830 August 1945.Yokosuka Naval Base, Tokyo Bay. Commander Yuzo Tanno hands over the keys of Yokosuka Naval Base to Captain H. J. Buchanan, Royal Australian Navy. Buchanan led the first Commonwealth party to go ashore in Japan. (from History of the Royal Australian Navy)
 -
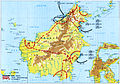 Image 19A map showing the progress of the Borneo campaign (from Military history of Australia during World War II)
 -
 Image 20An aerial view of the second HMAS Australia – a heavy cruiser – passing through the Panama Canal in March 1935. Australia saw extensive combat in World War II. (from History of the Royal Australian Navy)
 -
 Image 21HMAS Melbourne launches aGrumman S2G Tracker, 1980 (from History of the Royal Australian Navy)
 -
 Image 22Operation Cartwheel in New Guinea and western New Britain (from Military history of Australia during World War II)
 -
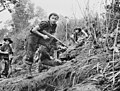 Image 23Commandos from the 2/3rd Independent Company in New Guinea during July 1943 (from Military history of Australia during World War II)
 -
 Image 24Soldiers from 3 RAR watch as a Korean village burns in late 1950 (from History of the Australian Army)
 -
 Image 25HMAS Canberra entering Sydney Harbour in 1930 (from History of the Royal Australian Navy)
 -
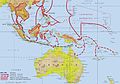 Image 26The Japanese advance through the Malay Barrier in 1941–1942 and feared offensive operations against Australia. (from Military history of Australia during World War II)
 -
 Image 27HMAS Anzac and HMAS Darwin with United States and British warships in late 2002 (from History of the Royal Australian Navy)
 -
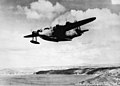 Image 28A No. 10 Squadron Sunderland departing for a patrol over the Atlantic in 1941 (from Military history of Australia during World War II)
 -
 Image 29HMAS Hobart refuels from a US Navy tanker during Operation Sea Dragon off Vietnam in 1967. (from History of the Royal Australian Navy)
 -
 Image 30Australian troops land in Alexandria after their evacuation from Greece (from Military history of Australia during World War II)
 -
 Image 31Australian and Dutch POWs at Tarsau, Thailand in 1943. Australia declared war on Thailand on 2 March 1942 and an Australian–Thai Peace Treaty was signed on 3 April 1946. (from Military history of Australia during World War II)
 -

-
-
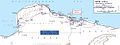 Image 34North Africa showing the progress of Operation Compass and strategic locations (from Military history of Australia during World War II)
 -
 Image 35An AIF recruiting poster (from Military history of Australia during World War II)
 -
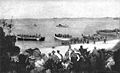 Image 36Australian soldiers landing at ANZAC Cove (from History of the Australian Army)
 -
 Image 37Australian women were encouraged to participate in the war effort (from Military history of Australia during World War II)
 -
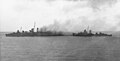 Image 38American destroyers evacuating the crew of HMAS Canberra after the Battle of Savo Island (from History of the Royal Australian Navy)
 -
 Image 39HMAS Shropshire arriving in Sydney in November 1945 carrying long serving soldiers (from Military history of Australia during World War II)
 -
 Image 40The wrecked German raider Emden (from History of the Royal Australian Navy)
 -
 Image 41The Japanese interpreter in charge of Australian POWs at Ambon arriving at Morotai in October 1945 (from Military history of Australia during World War II)
 -
 Image 42An Australian Halifax from No. 462 Squadron RAAF at RAF Foulsham in 1945. (from History of the Royal Australian Air Force)
 -
 Image 43An Australian Flying Corps aircraft c. 1918 (from History of the Royal Australian Air Force)
 -
 Image 44Central Bureau's headquarters building at Ascot in Brisbane (from Military history of Australia during World War II)
 -
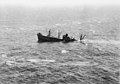 Image 45A liberty ship sinking after being attacked by I-21 near Port Macquarie in February 1943 (from Military history of Australia during World War II)
 -
 Image 46Australians arrive atTan Son Nhut Airport, Saigon (from History of the Australian Army)
 -
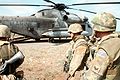 Image 47Australian soldiers in Somalia during Operation Solace (from History of the Australian Army)
 -
 Image 48Australian soldiers in New Britain in 1945 (AWM 092342). (from History of the Australian Army)
 -
 Image 49An Australian Beaufighter flying over the Owen Stanley Range in New Guinea in 1942 (from History of the Royal Australian Air Force)
 -
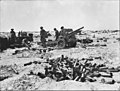 Image 50Guns of the 2/8th Field Regiment at El Alamein in July 1942 (from Military history of Australia during World War II)
 -
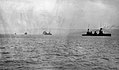 Image 51The Australian squadron entering Simpson Harbour, Rabaul, September 1914 (from History of the Royal Australian Navy)
 -
 Image 52Australian light tanks and infantry in action at Buna (from Military history of Australia during World War II)
 -
 Image 53Women are expected to play a greater role in the RAN in the future (from History of the Royal Australian Navy)
 -
 Image 54HMAS Melbourne steams into San Diego Harbor, California (USA), in 1977. (from History of the Royal Australian Navy)
 -
 Image 55HMAS Sydney leading HMAS Melbourne (from History of the Royal Australian Navy)
 -
 Image 56Australian troops at Milne Bay (from Military history of Australia during World War II)
 -
 Image 57The 10th Reinforcements of the 5th Pioneers at Port Melbourne prior to embarkation, October 1917 (from History of the Australian Army)
 -
 Image 58A sailor from HMAS Adelaide inspecting a ship in the Persian Gulf during 2004 (from History of the Royal Australian Navy)
 -
 Image 59Portside view of the Challenger-class light cruiser HMAS Encounter (from History of the Royal Australian Navy)
 -
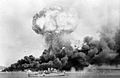 Image 60An oil storage tank explodes during the first Japanese air raid on Darwin on 19 February 1942 (from Military history of Australia during World War II)
 -
 Image 61Recruitment poster, 1914–1918. (from History of the Australian Army)
 -
 Image 62HMAS Anzac operating in support of Operation Enduring Freedom (from History of the Royal Australian Navy)
 -
 Image 63Sailors from Sydney posing around and in the forward funnel shellhole (from History of the Royal Australian Navy)
 -
 Image 64Australian sailors take possession of a midget submarine at a Japanese naval base near Tokyo in September 1945. (from History of the Royal Australian Navy)
 -
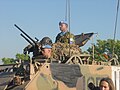 Image 65Australian troops in East Timor in May 2002 (from History of the Australian Army)
 -
 Image 66Australian soldiers and local civilians on Labuan Island. The soldier on the left is armed with an Australian-designedOwen gun. (from Military history of Australia during World War II)
 -
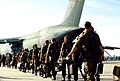 Image 67Australian engineers board the United StatesC-5 Galaxy aircraft which will transport them to Namibia (from History of the Australian Army)
 -
 Image 68Australian soldiers display Japanese flags they captured at Kaiapit, New Guinea in 1943 (from History of the Australian Army)
 -
 Image 69General Blamey signing the Japanese instrument of surrender on behalf of Australia (from Military history of Australia during World War II)
 -
 Image 70The Kokoda and Buna-Gona campaigns (from Military history of Australia during World War II)
 -
 Image 71MacArthur with Blamey and Prime Minister Curtin in March 1942 (from Military history of Australia during World War II)
 -
 Image 72Fairey Firefly aircraft on board HMAS Sydney off Korea, during the Korean War. (from History of the Royal Australian Navy)
 -
 Image 73Workers inspecting practice bombs at a factory in South Australia during 1943 (from Military history of Australia during World War II)
 -
 Image 74Four members of the Australian contingent to Mission 204 inYunnan Province, China, during 1942 (from Military history of Australia during World War II)
 -
 Image 75Australia on her side and sinking during her scuttling in April 1924 (from History of the Royal Australian Navy)
 -
 Image 76An Australian light machine gun team in action during the Aitape–Wewak campaign, June 1945. (from Military history of Australia during World War II)
 -
 Image 77HMAS Pioneer off East Africa in 1916 (from History of the Royal Australian Navy)
 -
 Image 78Infantry at Wide Bay in January 1945 (from Military history of Australia during World War II)
 -
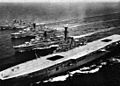 Image 79Melbourne with Vendetta, Voyager and Queenborough, circa 1962 (from History of the Royal Australian Navy)
 -
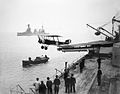 Image 80Abattle cruiser, in 1918. (from History of the Royal Australian Navy)
 -
 Image 81"He's coming south — It's fight, work or perish", a propaganda poster warning of the danger of Japanese invasion. (from Military history of Australia during World War II)
 -
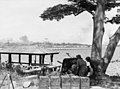 Image 82Australian anti-tank gunners overlooking theJohor Causeway between Singapore and Malaya in February 1942 (from Military history of Australia during World War II)
 -
 Image 83Troops of the 2/16th Battalion disembark from Dakota aircraft at Kaiapit (from Military history of Australia during World War II)
 -

-
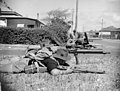 Image 85Australian soldiers exercising to defendGeraldton, Western Australia in October 1942 (from Military history of Australia during World War II)
 -
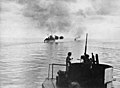 Image 86HMAS Australia and Arunta bombarding Cape Gloucester (from Military history of Australia during World War II)
 -
 Image 87No. 80 Squadron aircraft at Noemfoor in November 1944 (from Military history of Australia during World War II)
 -
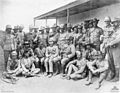 Image 88Australian and British officers in South Africa during the Second Boer War (from History of the Australian Army)
 -
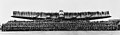 Image 89Members of No. 460 Squadron and the Lancaster bomber G for George in August 1943 (from Military history of Australia during World War II)
 -
 Image 90Memorial to HMAS Sydney at the state war memorial in Western Australia (from History of the Royal Australian Navy)
Daily unit article
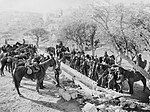
Australians of the Anzac Mounted Division watering their horses at the foot of Mount Zion in 1918 The
Gallipoli Campaign when the Australian and New Zealand mounted regiments returned from fighting as infantry. For the remainder of the war it served in the Middle East, in the Sinai, Palestine and Syria. The Anzac Mounted Division was disbanded following the end of the war.Selected quote
"Should the worst happen Australia would rally to the Mother Country to help and defend her to our last man and our last shilling"
- — Opposition Leader of Australia at the outbreak of World War I
Related portals
WikiProjects

- History of Australia
- Military History
- Australian military history task force
Recognized content
Categories

Category puzzle Select [►] to view subcategoriesThings you can do
Associated WikiMedia
The following Wikimedia Foundation sister projects provide more on this subject:
-
 Commons
Free media repository -
 Wikibooks
Free textbooks and manuals -
 Wikidata
Free knowledge base -
 Wikinews
Free-content news -
 Wikiquote
Collection of quotations -
 Wikisource
Free-content library -
 Wikiversity
Free learning tools -
 Wiktionary
Dictionary and thesaurus
More portals
- P:ADF
.jpg)

.jpg)


.jpeg)
_at_Espiritu_Santo_on_23_July_1943.jpg)

.jpg)
.jpg)
.jpg)

.jpg)


_passing_through_the_Panama_Canal_in_March_1935.jpg)


.jpg)


.jpg)
_refuels_HMAS_Hobart_(D39)_off_Vietnam_in_1967.jpg)
.jpg)

.jpg)
.jpg)
.jpg)

.jpg)
_with_US_destroyers_on_9_August_1942.jpg)
.jpg)


.jpg)

.jpg)


.jpg)

.jpg)

,_drives_a_Rigid_Hull_Inflatible_Boat_(RHIB)_back_to_her_ship_after_making_a_passenger.jpg)
_San_Diego_1977.jpeg)
.jpg)

.jpg)


.jpg)


.jpg)
.jpg)

.jpg)


.jpg)
.jpg)
_with_destroyers_c1962.jpg)

.jpg)
.jpg)

_cropped.jpg)
.jpg)
.jpg)
.jpg)


.jpg)


