Biaxial tensile testing
In materials science and solid mechanics, biaxial tensile testing is a versatile technique to address the mechanical characterization of planar materials. It is a generalized form of tensile testing in which the material sample is simultaneously stressed along two perpendicular axes. Typical materials tested in biaxial configuration include metal sheets,[1] silicone elastomers,[2] composites,[3] thin films,[4]

Purposes of biaxial tensile testing
A biaxial tensile test generally allows the assessment of the mechanical properties [7] and a complete characterization for uncompressible isotropic materials, which can be obtained through a fewer number of specimens with respect to uniaxial tensile tests.[8] Biaxial tensile testing is particularly suitable for understanding the mechanical properties of biomaterials, due to their directionally oriented microstructures.[6] If the testing aims at the material characterization of the post elastic behaviour, the uniaxial results become inadequate, and a biaxial test is required in order to examine the plastic behaviour.[5] In addition to this, using uniaxial test results to predict rupture under biaxial stress states seems to be inadequate.[9][10]
Even if a biaxial tensile test is performed in a planar configuration, it may be equivalent to the stress state applied on three-dimensional geometries, such as cylinders with an inner pressure and an axial stretching.[11] The relationship between the inner pressure and the circumferential stress is given by the Mariotte formula:
Equipment
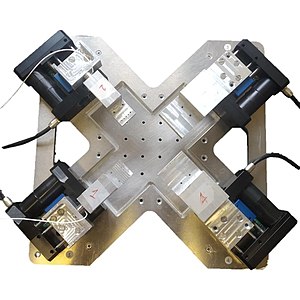
Typically, a biaxial tensile machine is equipped with motor stages, two load cells and a gripping system.
Motor stages
Through the movement of the motor stages a certain displacement is applied on the material sample. If the motor stage is one, the displacement is the same in the two direction and only the equi-biaxial state is allowed. On the other hand, by using four independent motor stages, any load condition is allowed; this feature makes the biaxial tensile test superior to other tests that may apply a biaxial tensile state, such as the hydraulic bulge, semispherical bulge, stack compression or flat punch. [12] Using four independent motor stages allows to keep the sample centred during the whole duration of the test; this feature is particularly useful to couple an image analysis during the mechanical test. The most common way to obtain the fields of displacements and strains is the Digital Image Correlation (DIC),[12] which is a contactless technique and so very useful since it doesn't affect the mechanical results.[13]
Load cells
Two load cells are placed along the two orthogonal load directions to measure the normal reaction forces explicated by the specimen. The dimensions of the sample have to be in accordance with the resolution and the full scale of the load cells.
A biaxial tensile test can be performed either in a load-controlled condition, or a displacement-controlled condition, in accordance with the settings of the biaxial tensile machine. In the former configuration a constant loading rate is applied and the displacements are measured, whereas in the latter configuration a constant displacement rate is applied and the forces are measured.
Dealing with elastic materials the load history is not relevant, whereas in viscoelastic materials it is not negligible. Furthermore, for this class of materials also the loading rate plays a role.[14]
Gripping system
The gripping system transfers the load from the motor stages to the specimen. Although the use of biaxial tensile testing is growing more and more, there is still a lack of robust standardized protocols concerning the gripping system. Since it plays a fundamental role in the application and distribution of the load, the gripping system has to be carefully designed in order to satisfy the Saint-Venant principle.[15] Some different gripping systems are reported below.
Clamps
The clamps are the most common used gripping system for biaxial tensile test since they allow a quite uniformly distributed load at the junction with the sample.[15] To increase the uniformity of stress in the region of the sample close to the clamps, some notches with circular tips are obtained from the arm of the sample.[16] The main problem related with the clamps is the low friction at the interface with the sample; indeed, if the friction between the inner surface of the clamps and the sample is too low, there could be a relative motion between the two systems altering the results of the test.
Sutures
Small holes are performed on the surface on the sample to connect it to the motor stages through wire with a stiffness much higher than the sample. Typically, sutures are used with square samples. In contrast to the clamps, sutures allow the rotation of the sample around the axis perpendicular to the plane; in this way they do not allow the transmission of shear stresses to the sample.[15] The load transmission is very local, thereby the load distribution is not uniform. A template is needed to apply the sutures in the same position in different samples, to have repeatability among different tests.
Rakes
This system is similar to the suture gripping system, but stiffer. The rakes transfer a limited quantity of shear stress, so they are less useful than sutures if used in presence of large shear strains. Although the load is transmitted in a discontinuous way, the load distribution is more uniform if compared to the sutures.[15]
Specimen shape
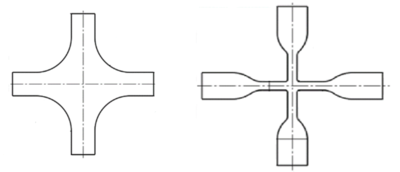
The success of a biaxial tensile test is strictly related to the shape of the specimen.[17] The two most used geometries are the square and cruciform shapes. Dealing with fibrous materials or fibres reinforced composites, the fibres should be aligned to the load directions for both classes of specimens, in order to minimize the shear stresses and to avoid the sample rotation.[15]

Square samples
Square or more generally rectangular specimens are easy to obtain, and their dimension and ratio depend on the material availability. Large specimens are needed to make negligible the effects of the gripping system in the core of the sample. However this solution is very material consuming so small specimen are required. Since the gripping system is very close to the core of the specimen the strain distribution is not homogeneous.[18] [19]
Cruciform samples
A proper cruciform sample should fulfil the following requirements:[20][21]
- maximization of the biaxially loaded area in the centre of the sample, where the strain field is uniform;
- minimization of the shear strain in the centre of the sample;
- minimization of regions of stress concentration, even outside the area of interest;
- failure in the biaxially loaded area;
- repeatable results.
Is important to note that on this kind of sample, the stretch is larger in the outer region than in the centre, where the strain is uniform.[16]
Method
Uniaxial stress test is typically used to measure
Small Punch Test (SPT)
The Small Punch Test (SPT) was first developed in the 1980s as minimal invasive
In terms of the testing, the disc shaped specimen is clamped between two dies. The punch is then pushed with a constant displacement rate through the specimen. A flat punch or concave tip pushing a ball are typically used in the test.[24] After the testing, some characteristic parameters such as force-displacement curves are used to estimate yield strength, ultimate tensile stress. Considering the curves with various temperatures from SPT tensile/fracture data, ductile to brittle transition temperature (DBTT) can be calculated.[25] One thing to be noticed is that the specimen used in SPT is suggested to be very flat to reduce the stress error caused by undefined contact situation.
Hydraulic Bulge Test (HBT)
Hydraulic Bulge Test (HBT) is a method of biaxial tensile testing. It used to determine the
In HBT, rupture discs and high-pressure hydraulic oil are used to cause specimen deformation which also used to avoid influence factors such as friction during small punch test. While there are constraints in test conditions, the temperature is limited by solidification and vaporization of hydraulic oil. High temperature would lead to loading failure, while low temperature result in the failure of the seal part and the leaking vapor might be dangerous.[28]
In HBT, a circular sample is normally stripped from a substrate on which they have been prepared and clamped over a hole around its periphery at the end of a cylinder. It experiences pressure from one side using hydraulic oil and then bulges and expands into a cavity with increasing pressure. The flow stress is calculated from the dome height of the bulging blank and the pressure and height can also be determined. Strain will be measured by Digital Image Correlation (DIC).[29] With the specimen thickness and clamper size being considered, the true stress and strain can be calculated.[27]
Other liquids may also be used as the hydraulic fluid in HBT. Xiang et al. (2005) developed a HBT for sub-micron thin films by using standard photolithographic microfabrication techniques etch away a small channel behind the film of interest, then pressurized the channel with water to bulge thin films.[30] Validity of this method was confirmed using finite element analysis (FEA).
Gas Bulge Test (GBT)
Gas bulge tests (GBT) operate similarly to HBT. Instead of a hydraulic oil, high-pressure gas is used to back-pressure a thin plate specimen. Since gas has a much lower density than liquid, the maximum safe pressure output from GBT is considerably lower than hydraulic systems. Therefore, elevated temperature GBT is often used to increase ductility of the specimen, enabling plastic deformation at lower pressures.
Unlike HBT, elevated temperatures are possible for GBT. Operating temperatures of biaxial bulge testing are limited by phase transitions of the pressurized fluid—gasses therefore have an extremely wide range of operating temperatures. GBT is suitable for studying fatigue, low and high-temperature mechanical properties (given sufficient ductility at low temperatures), and thermal cycling. Additionally, holding pressure at a high temperature allows for testing time-dependent mechanical properties such as creep.
High temperature DIC may be used to measure biaxial stress and strain during GBT. Alternatively, a laser interferometer may be used to find the displacement near the apex of the dome, and many models are presented for calculating both radius of curvature and radial strain of bulged specimens.[31] True stress is best approximated by the Young-Laplace equation. Results are comparable to biaxial testing standard ISO 16808.[31] Clamping of elevated-temperature gas bulge specimens requires clamping materials with an operating temperature in excess of the operating temperature. This is possible using high-temperature mechanical fasteners, or by directly bonding materials via traditional welding, friction stir welding (FSW), or diffusion bonding.
GBT example studies
Frary et al. (2002) use GBT to demonstrate superplastic deformation of commercially pure (CP) titanium and Ti64 by thermally cycling through the material’s α/β transformation temperature.[32]
Huang et al. (2019) measure coefficients of thermal expansion through GBT, and thermally cycle NiTi shape memory alloys to measure stress evolution.[33]
The ability to perform GBT in parallel for an array of specimens enables high-throughput screening of mechanical properties and facilitates rapid materials design. Ding et al. (2014) conducted parallel measurements of viscosity across a huge composition-space of bulk metallic glass.[34] Instead of using a direct pressure hookup, tungstic acid was placed into the cavities behind the specimen plate and decomposed to produce gas upon heating to ~100 °C.
Analytical solution
A biaxial tensile state can be derived starting from the most general constitutive law for isotropic materials in large strains regime:
For an uncompressible material, the previous equation becomes:
A well-posed problem requires specifying ; for a biaxial state of a membrane , thereby the p term can be obtained
According to the definition, the three non zero components of the
Consequently, the components of C can be calculated with the formula , and they are , and .
According with this stress state, the two non zero components of the second Piola-Kirchhoff stress tensor are:
By using the relationship between the second Piola-Kirchhoff and the Cauchy stress tensor, and can be calculated:
Equi-biaxial configuration
The simplest biaxial configuration is the equi-biaxial configuration, where each of the two direction of load are subjected to the same stretch at the same rate. In an uncompressible isotropic material under a biaxial stress state, the non zero components of the deformation gradient tensor F are and .
According to the definition of C, its non zero components are and .
The Cauchy stress in the two directions is:
Strip biaxial configuration

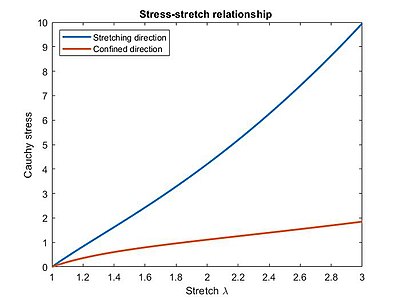
A strip biaxial test is a test configuration where the stretch of one direction is confined, namely there is a zero displacement applied on that direction. The components of the C tensor become , and . It is worth nothing that even if there is no displacement along the direction 2, the stress is different from zero and it is dependent on the stretch applied on the orthogonal direction, as stated in the following equations:
The Cauchy stress in the two directions is:
The strip biaxial test has been used in different applications, such as the prediction of the behaviour of orthotropic materials under a uniaxial tensile stress,[35] delamination problems,[36] and failure analysis.[37]
FEM analysis
Finite Element Methods (FEM) are sometimes used to obtain the material parameters.[38][39][40] The procedure consists of reproducing the experimental test and obtain the same stress-stretch behaviour; to do so, an iterative procedure is needed to calibrate the constitutive parameters. Nevertheless, the cracking behavior of a cruciform specimen under mixed mode loading can be determined using FEA. Franc2d program is used to calculate the stress intensity factor (SIF) for such specimens using the linear elastic fracture mechanics approach.[41] This kind of approach has been demonstrated to be effective to obtain the stress-stretch relationship for a wide class of hyperelastic material models (Ogden, Neo-Hooke, Yeoh, and Mooney-Rivlin).[16]
Standards
- ISO 16842:2014 metallic materials – sheet and strip – biaxial tensile testing method using a cruciform test piece.
- ISO 16808:2014 metallic materials – sheet and strip – determination of biaxial stress-strain curve by means of bulge test with optical measuring systems.
- ASTM D5617 – 04(2015) – Standard Test Method for Multi-Axial Tension Test for Geosynthetics.
- DIN EN 17117 – A German standard describes methods of the test using biaxial stress states for the determination of the tensile stiffness properties of biaxially oriented coated fabrics
See also
References
- S2CID 139422228.)
{{cite journal}}: CS1 maint: DOI inactive as of June 2024 (link - S2CID 216247078.
- S2CID 137125772.
- .
- ^ ISBN 978-3-319-02227-7.
- ^ S2CID 122691243.
- .
- ISBN 978-8855531764.
- .
- S2CID 137693661.
- S2CID 125599187.
- ^ S2CID 138867754.
- .
- .
- ^ S2CID 52165671.
- ^ S2CID 137074141.
- .
- .
- ISBN 1-4020-0683-7.
- PMID 32456238.
- .
- ISSN 2211-8128.
- S2CID 225390035.
- ISSN 0167-8442.
- ^ "Small Punch Test - Helmholtz-Zentrum Dresden-Rossendorf, HZDR". www.hzdr.de (in German). Retrieved 2022-05-17.
- ISSN 0020-7403.
- ^ S2CID 137244985.
- PMID 28772379.
- ^ "Bulge and Dome Testing". AHSS Guidelines. 2020-11-26. Retrieved 2022-05-17.
- ISSN 0884-2914.
- ^ .
- ISSN 1073-5623.
- ISSN 2424-2837.
- PMID 24728462.
- S2CID 138458121.
- S2CID 135776025.
- .
- .
- .
- PMID 33562220.
- S2CID 138040758.


