
Gold Beach
| Gold Beach | |||||||
|---|---|---|---|---|---|---|---|
| Part of the Normandy landings | |||||||
 Men of No. 47 Commando landing on Gold near La Rivière | |||||||
| |||||||
| Belligerents | |||||||
|
| |||||||
| Commanders and leaders | |||||||
|
Douglas Alexander Graham | |||||||
| Units involved | |||||||
| |||||||
| Casualties and losses | |||||||
| 1,000–1,100 (350 killed) | Unknown | ||||||
Gold, commonly known as Gold Beach, was the code name for one of the five areas of the Allied invasion of German-occupied France in the Normandy landings on 6 June 1944, during the Second World War. Gold, the central of the five areas, was located between Port-en-Bessin on the west and the Lieu-dit La Rivière in Ver-sur-Mer on the east. High cliffs at the western end of the zone meant that the landings took place on the flat section between Le Hamel and La Rivière, in the sectors code-named Jig and King. Taking Gold was to be the responsibility of the British Army, with sea transport, mine sweeping, and a naval bombardment force provided by the Royal Navy as well as elements from the Dutch, Polish and other Allied navies.
The objectives at Gold were to secure a
On
Meanwhile, infantry began clearing the heavily fortified houses along the shore and advanced on targets further inland. The
Background
Operation Overlord

After the Germans
On 31 December 1943, Eisenhower and Montgomery first saw the plan, which proposed amphibious landings by three divisions and two-thirds of an airborne division.[6] The two generals immediately insisted that the scale of the initial invasion be expanded to five divisions, with airborne descents by three divisions, to allow operations on a wider front.[7] The change doubled the frontage of the invasion from 25 miles (40 km) to 50 miles (80 km). This would allow for quicker offloading of men and materiel, make it more difficult for the Germans to respond, and speed up the capture of the port at Cherbourg.[8] The need to acquire or produce extra landing craft and troop carrier aircraft for the expanded operation meant that the invasion had to be delayed to June.[9]
The Americans, assigned to land at
Allied planning
Originally, seventeen sectors along the Normandy coastline had been selected as possible invasion sites and each were provided with a code name taken from one of the
The

Gold was assigned to
Arriving in the second wave on Jig, the 56th Infantry Brigade was to capture Bayeux and a nearby ridge, thus cutting the N13 highway between Caen and Bayeux to make it difficult for the Germans to move in reinforcements. The second wave on King, the 151st Infantry Brigade, was tasked with capturing the Caen road and railway, along with setting up positions on high ground between the Aure and Seulles rivers.[31][32] Other forces involved in the landing included artillery regiments, signals corps, and engineering units.[33]
German defenses

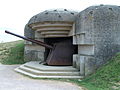
In late 1943, Hitler placed Field Marshal Erwin Rommel in charge of improving the coastal defences along the Atlantic Wall in anticipation of an Allied invasion, expected to take place sometime in 1944.[34] Rommel believed that the Normandy coast could be a possible landing point for the invasion, so he ordered the construction of extensive defensive works along that shore.[35] In the immediate area of Gold, between Le Hamel and La Rivière, seven defensive strongpoints designed to hold 50 men apiece were constructed. Two major concrete-reinforced coastal artillery emplacements (a battery of four 122 mm guns at Mont Fleury and the Longues-sur-Mer battery, with four 150 mm guns) were only partially completed by D-Day.[36] Rommel ordered wooden stakes, metal tripods, mines, and large anti-tank obstacles to be placed on the beach to delay the approach of landing craft and impede the movement of tanks.[37] Expecting the Allies to land at high tide so that the infantry would spend less time exposed on the beach, he ordered many of these obstacles to be placed at the high tide mark.[38] Tangles of barbed wire, booby traps, and the removal of ground cover made the approach hazardous for infantry.[39]
Hitler gave Rommel command of the newly re-formed Army Group B, which included the
Order of battle
British forces

- 50th (Northumbrian) Infantry Division, commanded by Major-General Douglas Graham[23][47][48][49]
- 69th Infantry Brigade, commanded by Brigadier F.Y.C. Knox
- 5th Battalion, East Yorkshire Regiment
- 6th Battalion, Green Howards
- 7th Battalion, Green Howards
- 151st Infantry Brigade, commanded by Brigadier R.H. Senior
- 6th Battalion, Durham Light Infantry
- 8th Battalion, Durham Light Infantry
- 9th Battalion, Durham Light Infantry
- 231st Infantry Brigade, commanded by Brigadier A.G.B. Stanier
- 1st Battalion, Dorsetshire Regiment
- 1st Battalion, Hampshire Regiment
- 2nd Battalion, Devonshire Regiment

- Divisional troops
- 61st Reconnaissance Regiment, Royal Armoured Corps (RAC) (2 Squadrons)
- 2nd Battalion, Cheshire Regiment (machine guns and heavy mortars)
- 357th, 358th & 465th Batteries, 90th Field Regiment, Royal Artillery (RA) (Self-propelled)
- 99th & 288th Batteries, 102nd (Northumberland Hussars) Anti-Tank Regiment, RA
- 82nd Battery, 25th Light Anti-Aircraft Regiment, RA
- 233rd (Northumbrian) Field Company, Royal Engineers (RE)
- 295th Field Company, RE
- 505th Field Company, RE
- 235th (Northumbrian) Field Park Company, RE (bulldozers)
- 50th Divisional Signals, Royal Corps of Signals
- 149th, 186th & 200th Field Ambulances, Royal Army Medical Corps (RAMC)
- 22nd Field Hygiene Section, RAMC
- 50th Divisional Provost Company, Royal Military Police (RMP)
- Formations attached for assault phase
- Elements of 79th Armoured Division
- Westminster Dragoons (Flail tanks)
- The Buffs) (Churchill Crocodiles) (2 Troops)
- 81st & 82nd Assault Squadrons, 6th Assault Regiment, RE (AVREs)
- 56th Infantry Brigade, commanded by Brigadier E.C. Pepper
- 2nd Battalion, Essex Regiment
- 2nd Battalion, Gloucestershire Regiment
- 2nd Battalion, South Wales Borderers
- 8th Armoured Brigade, commanded by Brigadier H.J.B. Carcroft
- DD Tanks)
- Nottinghamshire Yeomanry (DD Tanks)
- 76th Anti-Aircraft Brigade, commanded by Brigadier E.R. Benson
- 113th Heavy Anti-Aircraft Regiment, RA (HQ only)
- 320th Battery, 93rd Light Anti-Aircraft Regiment, RA
- 394th & 395th Batteries, 120th Light Anti-Aircraft Regiment, RA
- 152nd Anti-Aircraft Operations Room, RA
- A Troop, 356th (Independent) Searchlight Battery, RA
- Additional units attached for assault phase
- GHQ Liaison Regiment, RAC ('Phantom')
- 341st, 342nd, & 462nd Batteries, 86th (East Anglian) (Hertfordshire Yeomanry) Field Regiment, RA (Self-propelled)
- 413th, 431st & 511th Batteries, 147th (Essex Yeomanry) Field Regiment, RA (Self-propelled)
- 198th & 234th Batteries, 73rd Anti-Tank Regiment, RA
- 662nd Air Observation PostSquadron, RA (Ground crew of one flight only)
- 73rd Field Company, RE
- 280th Field Company, RE
- 203rd Field Ambulance, RAMC
- 168th Light Field Ambulance, RAMC
- 1st Royal Marine Armoured Support Regiment
- No. 47 (Royal Marine) Commando
- 8 GHQ Troops RE (sub units distributed between the Beach Groups)
- 1043 Port Operating Group RE (other sub units distributed between the Beach Groups)
- 953rd Inland Water Transport Company
- 4 RAF Beach Squadron (sub units distributed between the Beach Groups)
- 980 RAF Beach Balloon Squadron (sub units distributed between the Beach Groups)
- No. 9 Beach Group (King beach)
- Beach signal section B10
- Beach Commandos 'J', 'G', and 'T'
- 2nd Battalion, Hertfordshire Regiment
- 69th, 89th & 183rd Field Companies, RE
- 74th Mechanical Equipment Section, RE
- 1043rd Port Operating Company, RE
- 961st Inland Water Transport Company, RE
- 21st Stores Sections, RE
- 305th General Transport Company, Royal Army Service Corps (RASC)
- 2nd Detail Issue Depot, RASC
- 247th Petrol Company, RASC
- 3rd & 10th Casualty Clearing Stations, RAMC
- 3rd, 32nd & 35th Field Dressing Stations, RAMC
- Nos 24 & 30 Field Transfusion Unit, RAMC
- 7th & 36th Ordnance Beach Detachments, Royal Army Ordnance Corps (RAOC)
- 24th Beach Recovery Section, Royal Electrical & Mechanical Engineers(REME)
- 243rd Provost Company, RMP
- 75th, 208th & 209th (Pioneer) Companies, Pioneer Corps
- 107th Beach Flight RAF
- 54th Beach Balloon Flight RAF
- No. 10 Beach Group (Jig beach)
- Beach signal section B7
- Beach Commando 'Q'
- 6th Battalion, Border Regiment
- 90th Field Company, RE
- 23rd Stores Section, RE
- 51st Mechanical Equipment Section, RE
- 23rd Port Operating Company, RE
- 536th & 705th General Transport Companies, RASC
- 5th Detail Issue Depot, RASC
- 244th Petrol Company, RASC
- 25th & 31st Field Dressing Stations, RAMC
- Nos 24 & 30 Field Transfusion Unit, RAMC
- 23rd & 1035th Port Operating Companies, RAMC
- 12th Ordnance Beach Detachment, RAOC
- 25th Beach Recovery Section, REME
- 243rd Provost Company, RMP
- 75th, 112th, 120th, 173rd & 243rd (Pioneer) Companies, Pioneer Corps
- 108th beach Flight RAF
- 55th Beach Balloon Flight RAF
- 36 Beach Brick (in reserve)
- 18th Battalion Durham Light Infantry
- 503rd Field Company RE
- HQ 100th HAA Regiment RA
- 305th HAA Battery RA
- 328th LAA Battery RA
- Detachments from RE, REME, RAMC, RMP, RAMC and RAF
- Nos 41, 42, 47 & 48 Field Surgical Units, RAMC
- 22nd & 23rd Port Details, RAMC
- XXX Corps Workshop, REME (2 Composite Workshops & 1 Light Recovery Section)
German forces
From June 1942, 716th Infantry Division covered the Grandcamps Sector, which stretched from the base of the Cotentin Peninsula to the Orne River near Caen, a distance of 77 kilometres (48 mi).[52] When 352nd Infantry Division arrived on 15 March, the Grandcamps Sector was split into the Bayeux Sector (from Carentan to Asnelles) and the Caen Sector (from Asnelles to the Orne). Most of the 716th Infantry Division remained where they were, and thus the defenses in Caen Sector (site of the Gold landings) were not substantially strengthened.[53]
- 352nd Infantry Division under Generalleutnant Dietrich Kraiss[54]
- 716th Static Infantry Division under Generalleutnant Wilhelm Richter[52]
- 726th Infantry Regiment: two battalions in and around Le Hamel. Members of the 441st Ost Battalion garrisoned the coastal defenses. One battalion was stationed near Crépon as reserves.[57]
- 736th Infantry Regiment: covered Juno, Sword, and the easternmost part of Gold[57]
- 1716th Artillery Regiment: mobile and casemated batteries east and west of Crépon[58]
Landings

Bombing of Normandy began around midnight with over 2,200 British and American bombers attacking targets along the coast and further inland.
King Sector

Specialised armour arriving in the first wave included AVREs,
Scheduled to land at 11:00 on Jig, the 56th Infantry Brigade was re-routed to King, because the gun battery at Le Hamel was still operational. They proceeded towards their objective of Bayeux.[77] 151st Brigade arrived at the same time and after meeting fierce resistance, they achieved their objective of controlling the road and railway between Bayeux and Caen.[78] 56th Brigade made slow progress and had to dig in for the night some distance from Bayeux.[79] 69th Brigade secured the eastern flank and by nightfall made contact with the Canadian forces on Juno.[79]
Jig Sector

At Jig, the first wave of infantry (the 1st Dorsetshires and 1st Hampshires of the 231st Infantry Brigade) arrived at 07:25, and immediately came under fire from the casemated 75 mm gun at Le Hamel. Due to navigation errors and the strong current, both groups came ashore well to the east of their intended landing points. The DD tank and Royal Marine Centaur tanks that were supposed to arrive in advance of the landing were delayed by rough seas and did not arrive until 08:00. Many of the tanks got bogged down on the beach or were taken out by enemy fire.[81] The tide came in quicker than expected, before many of the beach obstacles and mines were cleared, and some of the landing craft were damaged as a result.[82] Two companies of the 1st Hampshires landed very close to the strong point at Le Hamel, and had to fight inland through enemy garrisons to get off the beach.[83] Attempts to flank Le Hamel were made difficult by the surrounding machine gun placements, mines, and barbed wire.[83] Elements of the 1st Hampshires captured the German strongpoint WN-36 at the eastern edge of the village of Asnelles.[84] When they turned west to move along the beach towards their primary objective at Le Hamel, they came under heavy fire and had to break off the attack.[85] Major Warren, in charge after the commanding officer Lieutenant Colonel Nelson Smith was wounded, decided that the troops would have to circle around and attack the emplacement from the rear, a process that took several hours.[86] The troops began to have some success around 15:00 with the arrival of an AVRE tank of 82nd Assault Squadron. The tank fired two petards into the sanatorium, where most of the defenders were located.[87] The German soldiers fled into fortified houses in Le Hamel and Asnelles, and were taken out in house-to-house combat. Few surrendered. The 75 mm gun was finally silenced at 16:00, when the AVRE tank fired a large petard charge into the rear entrance of the casemate.[88] C/A Company, 1st Hampshires and the AVRE tank proceeded west along the beach and took out strongpoint WN-38 at La Fontaine St Côme, taking 20 prisoners. Still further west, D Company captured strong point WN-39 at the Arromanches radar station, capturing 30 more defenders.[89]
The 2nd Devons arrived at 08:15, while the beach was still under heavy fire. One company stayed to help with the assault on Le Hamel, while the rest moved to capture the village of Ryes astride the road to Bayeux.[90] Ryes was captured at around 16:30.[91] The 1st Dorsets attacked a German position on the beach at La Cabane des Douanes and headed inland to arc westward toward the high ground south of Arromanches.[92] They cleared enemy positions at Le Bulot and Puits d'Hérode, and arrived at their destination late in the morning.[90] Joined by elements of the 1st Hampshires and covered by indirect fire from the naval forces offshore, they took Arromanches late in the afternoon.[62]

47th Commando
The 47th Royal Marine Commando was assigned to capture the small harbour at
In rough seas and under enemy fire, the commandos began disembarking at Jig, some distance east of their intended position, at 09:50. Five of their LCAs were sunk by beach obstacles or enemy fire, at the cost of 76 casualties. Major P. M. Donnell temporarily took charge until Phillips and some others who had got separated from the unit rejoined the group at 14:00 along the Meuvaines–Le Carrefour road. The commandos took additional casualties in several skirmishes, including at La Rosière, on the way to Point 72. They did not arrive there until 22:30, too late to launch an attack, so they dug in for the night. The town and port were captured in the battle of Port-en-Bessin on 7–8 June 1944.[94][90]
German response

As the
Because Allied air superiority meant it would be difficult for the Germans to move up their reserves, Rommel believed that their best chance was to stop the invasion at the shore.
The
Aftermath
Analysis
Pockets of German resistance remained throughout the beachhead area and the British were stopped about 3.7 miles (6.0 km) short of their D-Day objectives.[106] Bayeux, a primary D-Day objective for 50th Division, was captured on 7 June.[107] By the end of D-Day, the 50th Division had lost around 700 men. Total casualties, from all units involved in operations at Gold, were in the region of 1,000–1,100 casualties, of which 350 were killed.[108] German losses are unknown; at least 1,000 were captured.[106]
Gold after 6 June

By the end of D-Day, 24,970 men had been landed at Gold, along with 2,100 vehicles and 1,000 long tons (1,000 t) of supplies.[102][109] The follow-up landings were slowed by the loss of 34 LCTs and the bad weather. The 24th Lancers and 61st Reconnaissance Regiment, due to land on D-Day to help spearhead the drive towards Villers-Bocage, were unable to put ashore until 7 June. In 2004 Trew wrote that the delay
effectively ruled out any chance of a thrust south ... [and] ... represented a major blow to Second Army's intentions and Montgomery's plan.[110][111]
The 7th Armoured Division and the 49th (West Riding) Infantry Division were the follow-up divisions of XXX Corps.[112] The 22nd Armoured Brigade (the armoured component of the 7th Armoured Division) was scheduled to land during the evening of 6 June, but it was unable to land until the next day.[102] The bulk of the division landed from 9 to 10 June, with some elements landing later.[113][114] The 49th Division came ashore on 12 June.[112][115]
The first components of the Mulberry harbours were brought across the Channel on D+1 and the structures were in use for unloading by mid-June.
Subsequent operations

Fighting in the Caen area versus the 21st Panzer, the 12th SS Panzer Division Hitlerjugend, and other units soon reached a stalemate.[123] Operation Perch (7–14 June) failed to take Caen, and the British were forced to withdraw to Tilly-sur-Seulles.[124] After a delay because of storms during 17–23 June, Operation Epsom was launched on 26 June, an attempt by VIII Corps to swing around and attack Caen from the south-west and establish a bridgehead south of the Odon.[125] Although the operation failed to take Caen, the Germans suffered heavy tank losses and had committed every available Panzer unit to the operation.[126] Caen was severely bombed on the night of 7 July and then occupied north of the River Orne in Operation Charnwood on 8–9 July.[127] Two offensives during 18–21 July, Operation Atlantic and Operation Goodwood, captured the rest of Caen and the high ground to the south, but by then the city was nearly destroyed.[128]
Tourism
The site of the Normandy landings is a popular tourist destination.
-
 Artillery emplacement at Longues-sur-Mer battery, 2010
 -
 Elements of the Mulberry harbour are still present at Arromanches
.JPG)
.JPG)
Citations
- ^ Ford & Zaloga 2009, p. 9.
- ^ Ford & Zaloga 2009, p. 11.
- ^ Wilmot 1997, p. 170.
- ^ a b Gilbert 1989, p. 491.
- ^ Whitmarsh 2009, pp. 12–13.
- ^ Balkoski 2005, p. 5.
- ^ Whitmarsh 2009, p. 13.
- ^ Balkoski 2005, p. 10.
- ^ Balkoski 2005, p. 19.
- ^ Churchill 1951, pp. 592–593.
- ^ Beevor 2009, Map, inside front cover.
- ^ Ellis, Allen & Warhurst 2004, pp. 78, 81.
- ^ Weinberg 1995, p. 698.
- ^ Buckingham 2004, p. 88.
- ^ a b Ford & Zaloga 2009, p. 276.
- ^ Trew 2004, pp. 92, 132.
- ^ Trew 2004, p. 34.
- ^ Ford & Zaloga 2009, pp. 351–352.
- ^ Zuehlke 2004, p. 81.
- ^ Whitmarsh 2009, p. 21.
- ^ a b Trew 2004, p. 41.
- ^ Wilmot 1997, p. 195.
- ^ a b Ford & Zaloga 2009, p. 271.
- ^ Ford & Zaloga 2009, p. 268.
- ^ Yung 2006, p. 153.
- ^ Whitmarsh 2009, pp. 30, 36.
- ^ Ford & Zaloga 2009, pp. 271–272.
- ^ Trew 2004, p. 49.
- ^ Ford & Zaloga 2009, pp. 276–277.
- ^ Trew 2004, pp. 34–35.
- ^ Ford & Zaloga 2009, p. 278.
- ^ Trew 2004, pp. 34, 38.
- ^ Trew 2004, p. 38.
- ^ Ford & Zaloga 2009, p. 30.
- ^ Ford & Zaloga 2009, p. 54.
- ^ Trew 2004, pp. 22–23.
- ^ Ford & Zaloga 2009, pp. 55–56.
- ^ a b Whitmarsh 2009, p. 31.
- ^ Ford & Zaloga 2009, pp. 54–56.
- ^ Goldstein, Dillon & Wenger 1994, p. 12.
- ^ Whitmarsh 2009, p. 12.
- ^ Trew 2004, p. 19.
- ^ Trew 2004, p. 14.
- ^ Trew 2004, pp. 14, 18.
- ^ Ford & Zaloga 2009, pp. 60, 63.
- ^ Trew 2004, p. 29.
- ^ Trew 2004, pp. 36–37.
- ^ Doherty 2011, pp. 71–77.
- ^ Routledge 1994, p. 308.
- ^ Joslen 2003, p. 581.
- ^ Rogers 2012, pp. 21, 156–7, 166–7.
- ^ a b Ford & Zaloga 2009, p. 60.
- ^ Trew 2004, p. 20–21.
- ^ Ford & Zaloga 2009, p. 63.
- ^ Trew 2004, pp. 24, 27.
- ^ a b Ford & Zaloga 2009, p. 62.
- ^ a b Ford & Zaloga 2009, p. 272.
- ^ Ford & Zaloga 2009, p. 304.
- ^ Trew 2004, pp. 48–49.
- ^ Beevor 2009, p. 79.
- ^ Trew 2004, p. 50.
- ^ a b Ford & Zaloga 2009, p. 299.
- ^ Ford & Zaloga 2009, pp. 286, 290.
- ^ Trew 2004, p. 51.
- ^ Holt & Holt 2009, p. 129.
- ^ a b Trew 2004, p. 60.
- ^ a b Ford & Zaloga 2009, p. 290.
- ^ Ford & Zaloga 2009, p. 292.
- ^ Ford & Zaloga 2009, pp. 290–291.
- ^ Ford & Zaloga 2009, p. 291.
- ^ Trew 2004, p. 64.
- ^ Trew 2004, p. 58.
- ^ Ford & Zaloga 2009, p. 294.
- ^ Ford & Zaloga 2009, pp. 294–295.
- ^ Ford & Zaloga 2009, p. 302.
- ^ Trew 2004, pp. 128–131.
- ^ Ford & Zaloga 2009, p. 295.
- ^ Ford & Zaloga 2009, pp. 295, 301.
- ^ a b Ford & Zaloga 2009, pp. 300–301.
- ^ Trew 2004, pp. 115, 121–122, 185.
- ^ Trew 2004, pp. 51–52, 55.
- ^ Trew 2004, p. 56.
- ^ a b Ford & Zaloga 2009, p. 286.
- ^ Trew 2004, p. 137.
- ^ Trew 2004, p. 55.
- ^ Ford & Zaloga 2009, p. 287.
- ^ Trew 2004, p. 145.
- ^ Ford & Zaloga 2009, pp. 298–299.
- ^ Trew 2004, pp. 146–147.
- ^ a b c Ford & Zaloga 2009, p. 289.
- ^ Trew 2004, p. 78.
- ^ Ford & Zaloga 2009, p. 282.
- ^ Trew 2004, pp. 152–153.
- ^ Trew 2004, p. 154.
- ^ Ford & Zaloga 2009, p. 131.
- ^ Beevor 2009, pp. 42–43.
- ^ Trew 2004, p. 67.
- ^ Beevor 2009, p. 86.
- ^ Ford & Zaloga 2009, pp. 303–305.
- ^ Ford & Zaloga 2009, p. 31.
- ^ Ford & Zaloga 2009, p. 303.
- ^ a b c Trew 2004, p. 84.
- ^ Trew 2004, pp. 85–86.
- ^ de Zeng 2007, p. 133.
- ^ Trew 2004, pp. 84–85.
- ^ a b Trew 2004, p. 83.
- ^ Beevor 2009, p. 175.
- ^ Trew 2004, pp. 83, 84.
- ^ Ellis, Allen & Warhurst 2004, p. 223.
- ^ Trew 2004, pp. 83–84.
- ^ Ellis, Allen & Warhurst 2004, p. 230.
- ^ a b Ellis, Allen & Warhurst 2004, p. 79.
- ^ Marie 2004, p. 50.
- ^ Taylor 1999, p. 84.
- ^ Chappell 1987, p. 33.
- ^ Wilmot 1997, p. 321.
- ^ Beevor 2009, pp. 215–216.
- ^ Ellis, Allen & Warhurst 2004, p. 479.
- ^ Wilmot 1997, p. 387.
- ^ Ford & Zaloga 2009, p. 331.
- ^ Ellis, Allen & Warhurst 2004, pp. 479–480.
- ^ Ellis, Allen & Warhurst 2004, pp. 302, 479.
- ^ Beevor 2009, p. 186.
- ^ Ellis, Allen & Warhurst 2004, pp. 247–254.
- ^ Wilmot 1997, p. 342.
- ^ Beevor 2009, pp. 232–237.
- ^ Beevor 2009, p. 273.
- ^ Ford & Zaloga 2009, pp. 340–341.
- ^ Ford & Zaloga 2009, p. 345.
- ^ Trew 2004, pp. 109–110.
- ^ Ford & Zaloga 2009, p. 352.
References
- Balkoski, Joseph (2005). Utah Beach: The Amphibious Landing and Airborne Operations on D-Day, June 6, 1944. Mechanicsburg, PA: Stackpole Books. ISBN 0-8117-0144-1.
- ISBN 978-0-670-02119-2.
- Buckingham, William F. (2004). D-Day: The First 72 Hours. Stroud: Tempus. ISBN 978-0-7524-2842-0.
- Chappell, Mike (1987). British Battle Insignia (2): 1939–1940. Men-At-Arms. London: Osprey. ISBN 0-85045-739-4.
- OCLC 396150.
- de Zeng, Henry (2007). Bomber Units of the Luftwaffe 1933–1945: A Reference Source I. The Second World War. Hinckley: Midland Ian Allan. ISBN 978-1-85780-279-5.
- ISBN 978-1-84884-398-1.
- Ellis, L.F.; Allen, G.R.G.; Warhurst, A.E. (2004) [1962]. ISBN 1-84574-058-0.
- Ford, Ken; ISBN 978-1-84603-424-4.
- ISBN 978-0-8050-1788-5.
- Goldstein, Donald M.; Dillon, Katherine V.; Wenger, J. Michael (1994). D-Day: The Story and Photographs. McLean, Virginia: Brassey's. ISBN 0-02-881057-0.
- Holt, Tonie; Holt, Valmai (2009). Major and Mrs Holt's Pocket Battlefield Guide to Normandy Landing Beaches. Barnsley: Pen & Sword Military. ISBN 978-1-84884-079-9.
- Joslen, Hubert F. (2003) [1960]. Orders of Battle, United Kingdom and Colonial Formations and Units in the Second World War, 1939–1945. Uckfield: Naval & Military Press. ISBN 1-843424-74-6.
- Marie, Henri (2004) [1993]. Villers-Bocage: Normandy 1944. Bayeux: Editions Heimdal; Bilingual edition. ISBN 978-2-84048-173-7.
- Rogers, Joseph & David (2012). D-Day Beach Force: The Men who Turned Chaos into Order (1st ed.). Stroud: The History Press. ISBN 978-0-7524-6330-8.
- Routledge, N.W. (1994). History of the Royal Regiment of Artillery: Anti-Aircraft Artillery 1914–55. London: Brassey's. ISBN 1-85753-099-3.
- Taylor, Daniel (1999). Villers-Bocage: Through the Lens of the German War Photographer. Old Harlow: Battle of Britain International. OCLC 43719285.
- Trew, Simon (2004). Gold Beach. Battle Zone Normandy. Stroud, Gloucestershire: Sutton. ISBN 0-7509-3011-X.
- ISBN 978-0-521-55879-2.
- Whitmarsh, Andrew (2009). D-Day in Photographs. Stroud: History Press. ISBN 978-0-7524-5095-7.
- ISBN 1-85326-677-9.
- Yung, Christopher D. (2006). Gators of Neptune: Naval Amphibious Planning for the Normandy Invasion. Annapolis: Naval Institute Press. ISBN 1-59114-997-5.
- Zuehlke, Mark (2004). Juno Beach: Canada's D-Day Victory: June 6, 1944. Vancouver: Douglas & McIntyre. ISBN 1-55365-050-6.
Further reading
- Books
- ISBN 978-0-671-67334-5.
- Converse, Allan (2011). Armies of Empire: The 9th Australian and 50th British Divisions in Battle, 1939–1945. Port Melbourne, Victoria: Cambridge University Press. ISBN 978-0-521-19480-8.
- Holborn, Andrew (2015). The D-Day Landing on Gold Beach: 6 June 1944. London; New York: Bloomsbury. ISBN 978-1-4411-3817-0.
- OCLC 1175409.
- Theses
- Holborn, Andrew (2010). The 56th Infantry Brigade and D-day: An Independent Infantry Brigade and the Campaign in North-West Europe 1944–1945. Bloomsbury Studies in Military History. London: Continuum. OCLC 1441119086. Archived from the originalon 10 April 2014. Retrieved 19 December 2014.
- Williams, E. R. (2007). 50 Div in Normandy: A Critical Analysis of the British 50th (Northumbrian) Division on D-Day and in the Battle of Normandy (MMAS). Fort Leavenworth: Army Command and General Staff College. OCLC 832005669.